After recording a band, there are two levels of mixing that are possible.
A Simple Live Mix. This is a basic mix of the exact performance with instruments and vocals set into a good soundstage that matches the actual event space.
Post-production. This is a mix in which several kinds of “fixes” are possible. Among the most common are:
Vocal pitch correction
Instrumental sound upgrades. For instance this might mean re-tracking an acoustic rhythm guitar using good microphones instead of a pickup only arrangement, or inserting drum replacement software on a poorly tuned kick drum.
Instrumental part fixes – For instance, correcting notes or even entire parts, fixing bass notes, or adjusting, tightening, or changing vocal harmonies.
Re-creation/improvement of the sonic space.
Most professional concert documentaries involve post-production (Neil Young at the Ryman, Alison Krauss and the Louisville Palace, etc.) and the effect is often that everything about the performance seems amazingly tight and effortless. Some post-production changes can be noticeable however: hearing three backup vocals when only two are actually singing, watching a guitar or bass player’s hands play a slightly different set of notes, etc.
Here are my guidelines for whether to pursue post-production.
Is the band rehearsed? It is not worth the time and effort to post-produce an unrehearsed band, with vocal harmonies that are not well constructed and thought through, individual instrumental parts and arrangement that are uneven and overly “jammed,” and haphazard attention to performance detail, etc.
Is the band recording-competent? Some bands will have one or more players whose sound works for the most part in a live setting, but whose vocal harmonies or instrumental work are full of sonic characteristics and missed notes that would make audio repair overly time-consuming: the harmony singer who constantly doubles another singer (or hangs onto notes too long, or sings the wrong notes in general), the bassist who wanders and finds only about 1/2 of the root notes, the rhythm guitarist who stops playing when he’s singing, the instrumental soloist whose lead work is full of missed strings, scales that don’t quite work, the drummer who slows or speeds up every song, etc.
What’s the goal of recording? Is there anything to be gained for the band’s resume by post-production? If the music is just to be used for rehearsal purposes, or for small local promotion efforts, it’s often not worth the extra time and expense. If the goal is a professional quality demo or demo-video or a band documentary, post-production is essential.
Many bands are well-rehearsed, have competent musicians, and want to take their live musical production to a professional level. This is where post-production makes sense.
I recently recorded a live performance of such a band: Bill Clark and the Route 51 Band. While the musicians are not studio-musicians, this is well-rehearsed acoustic Americana band in Louisville, KY, with instrumentalists and vocalists whose live performances are carefully shaped and within range of post-production. There were occasional bass notes, a few lead guitar chops, some vocal harmonies, a few pitch issues, and a kick drum that needed a little attention. These were all small things, so the performance of most songs were within range of post-production.
Here is the before and after of a section of lead guitar work on one song where the guitarist, Tom Roller, came into the studio and re-recorded his lead. The only preparation work for this section of the song was to use Izotope’s “Music Rebalance” software to pull the lead guitar bleed out of the drum overhead mics for that section of the song. This allowed Tom to record a new lead that diverged somewhat from his original.
Here’s the 33 second clip of the live performance with a couple of small mistakes:
Here is a clip of the same section of the song after post-production work, when Tom came into the studio and over-dubbed his lead guitar part:
When setting up to record a band live, I sometimes get such questions/observations as: “So, you just make one recording, pan things left and right, and cut them into individual songs?” Or, “Why does it take you that long to mix the music. Isn’t it just a matter of panning the instruments and voices, and maybe adding a little reverb to make it sound cool?”
From a layperson’s perspective, this may be all that seems to be required. But let me clarify what live mixing typically involves. Then I’ll mention a few things that typically go “above and beyond” and involve more than a typical live mix.
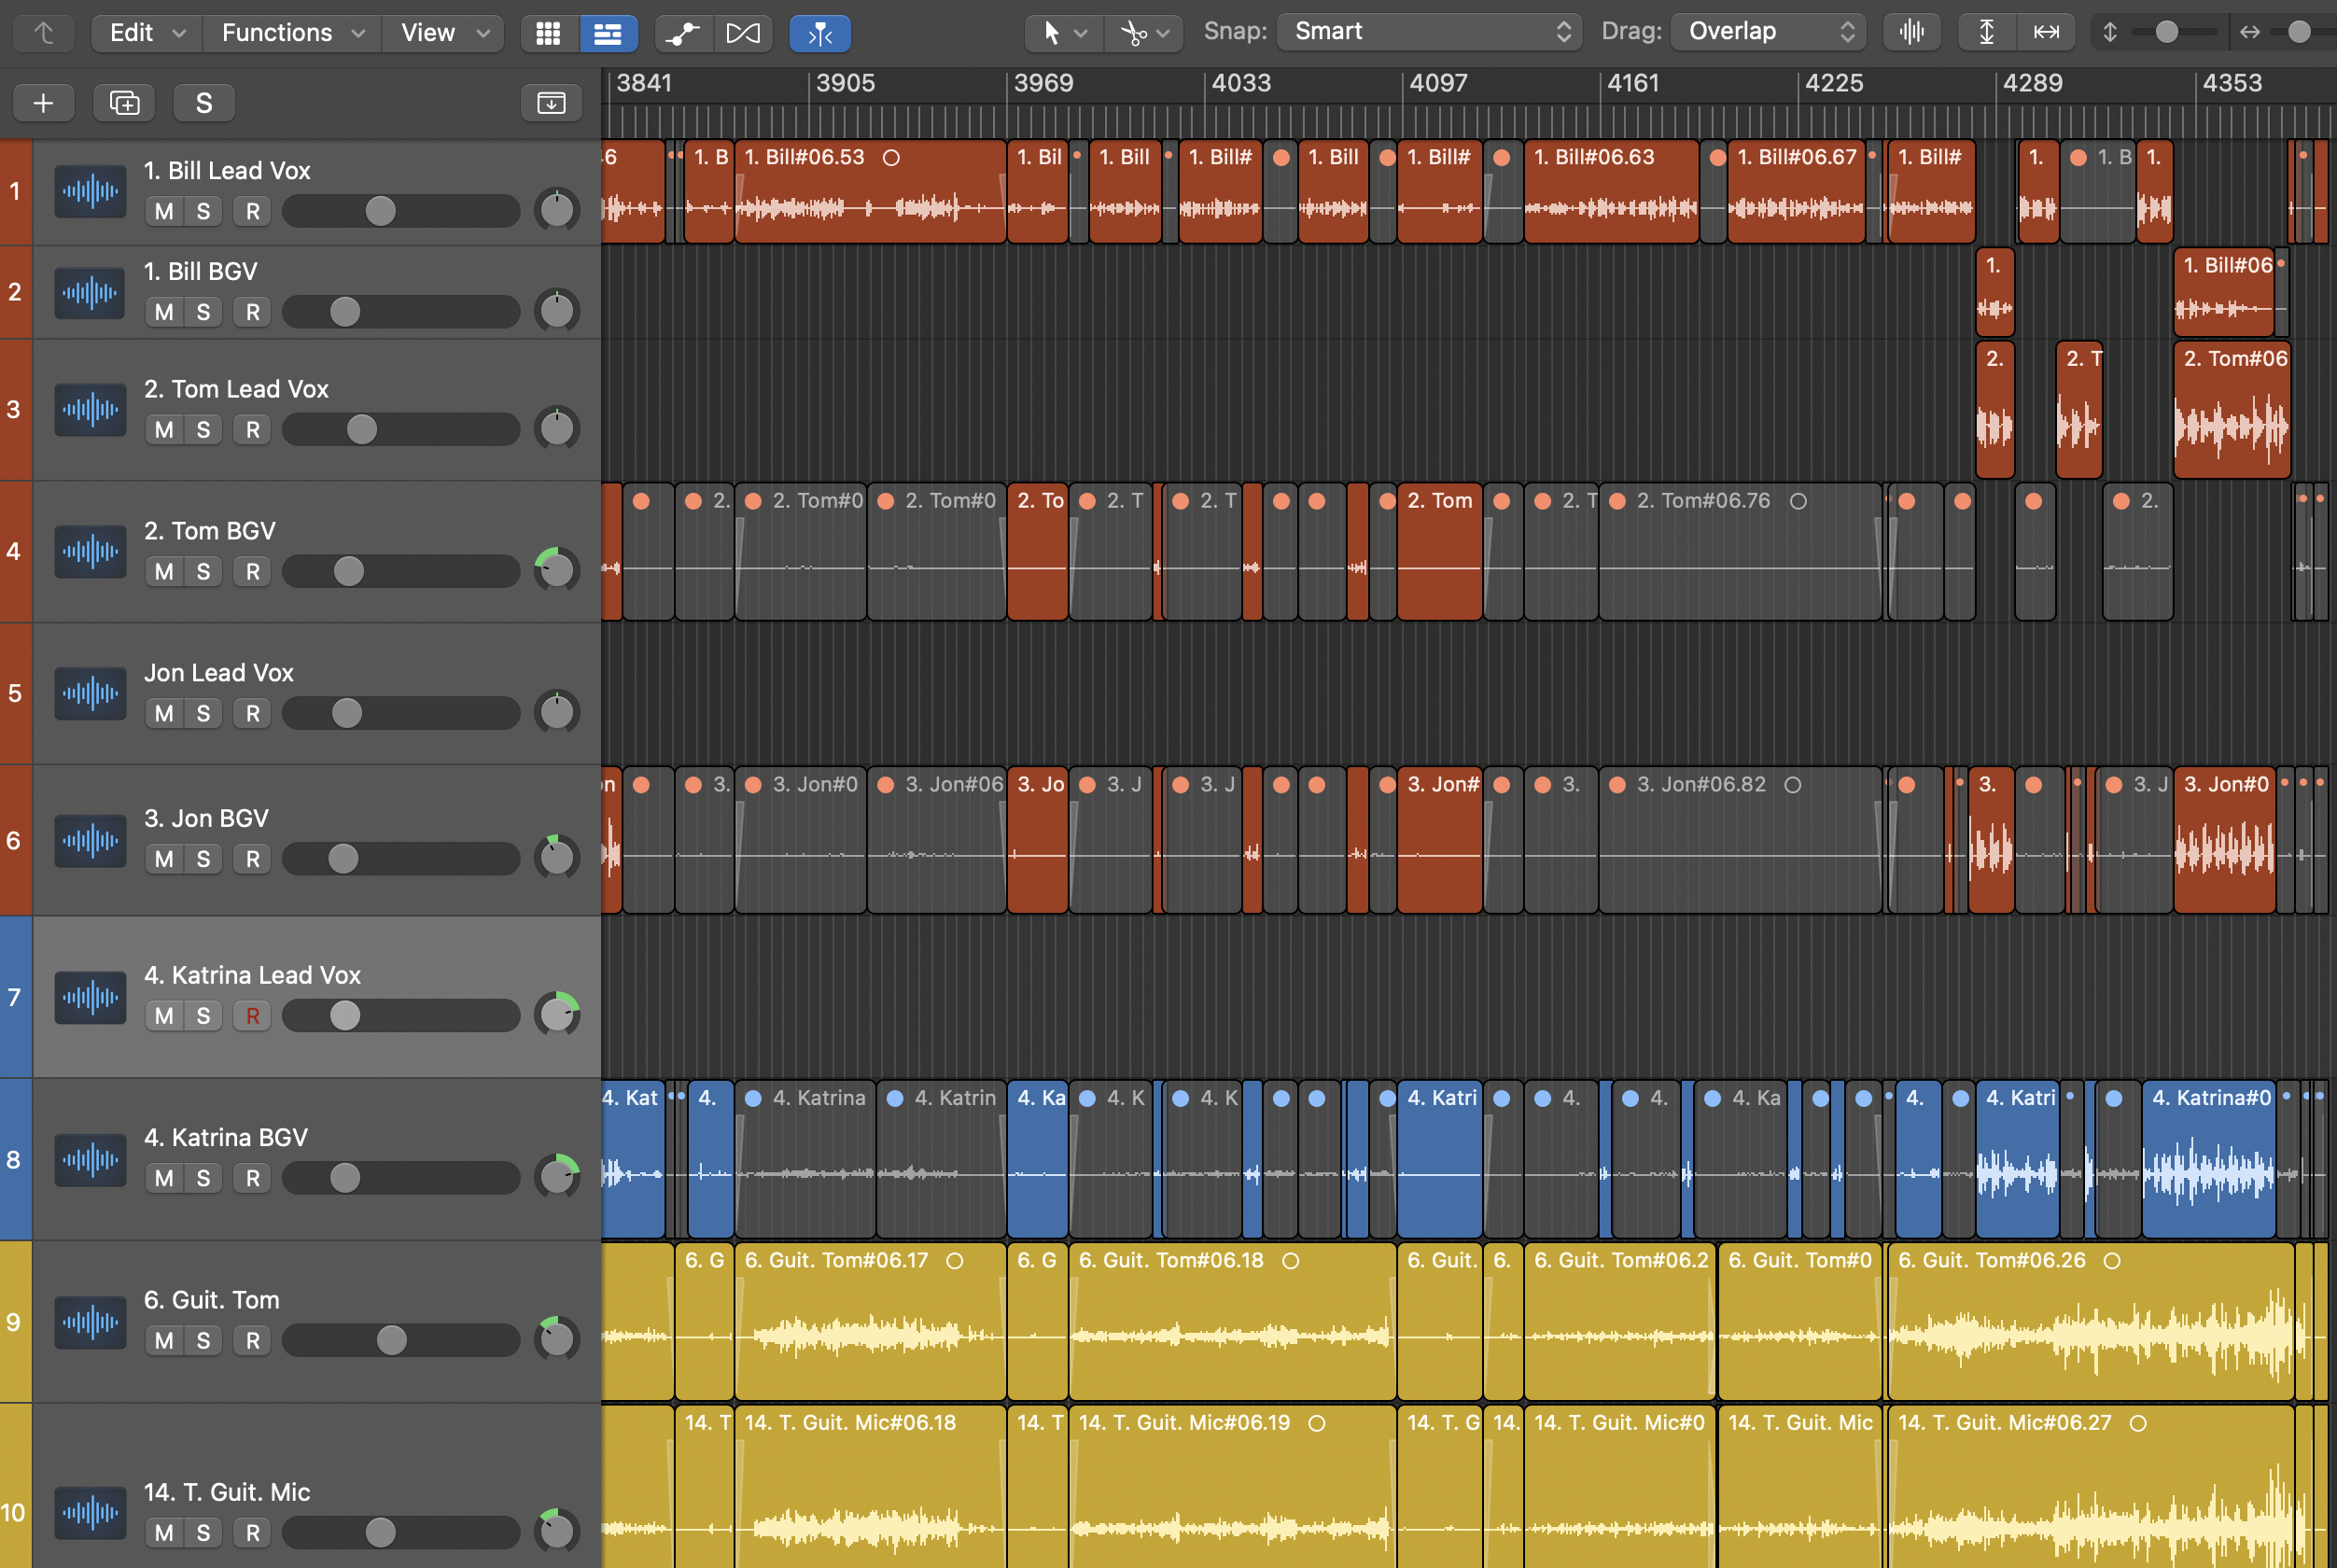
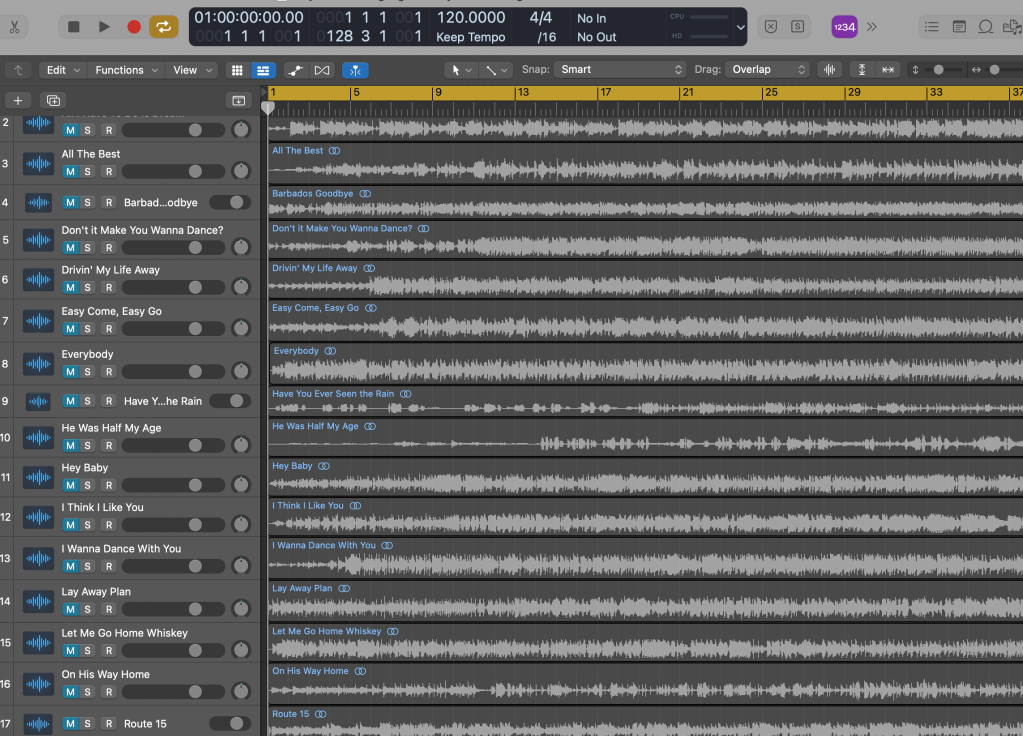
1. Cleaning and arranging the tracks. First of all, for each song, the tracks need to be cleaned and arranged. Usually, this means: 1) that any time a miked instrument or voice is idle, the track is muted, to minimize bleeding into other tracks; 2) that the beginning and end of each track has to be identified, and faders in/out have to be applied; 3) any noise (bumped mics, strange screams from the audience, etc.) is minimized; 4. that tracks for both lead and background vocals are created for each singer.
In the photo above the grey areas are muted. The shaded areas at the beginning and end of sections indicate the fade-ins and fade-outs of each song. Notice that both lead and background vocal tracks are present for each singer who does both.
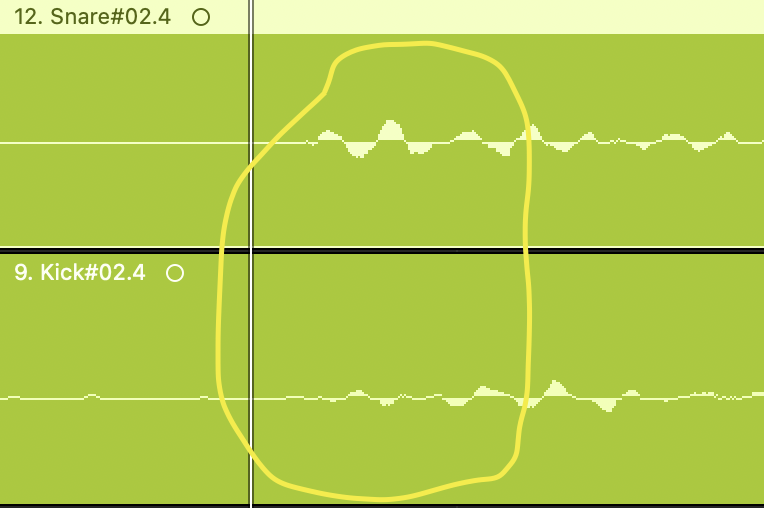
2. Aligning tracks and addressing phase issues. It is important, especially if the drums and back line instruments are a long way from front of stage microphones to nudge those track “forward” ever so slightly to keep stage “delay” under control. This can be done by ear, and by visually aligning the transients between back line tracks and front of stage microphones. It is also crucial to address any out of phase issues between individual drums (kick and snare, snare and hi hat, overheads and snare, etc.) Usually, reversing the polarity of one or two drums will solve these issues.
In the photo above the different directions that these transients are moving indicate a possible phase issue, or the need to nudge a track slightly in one direction or another to match correctly.
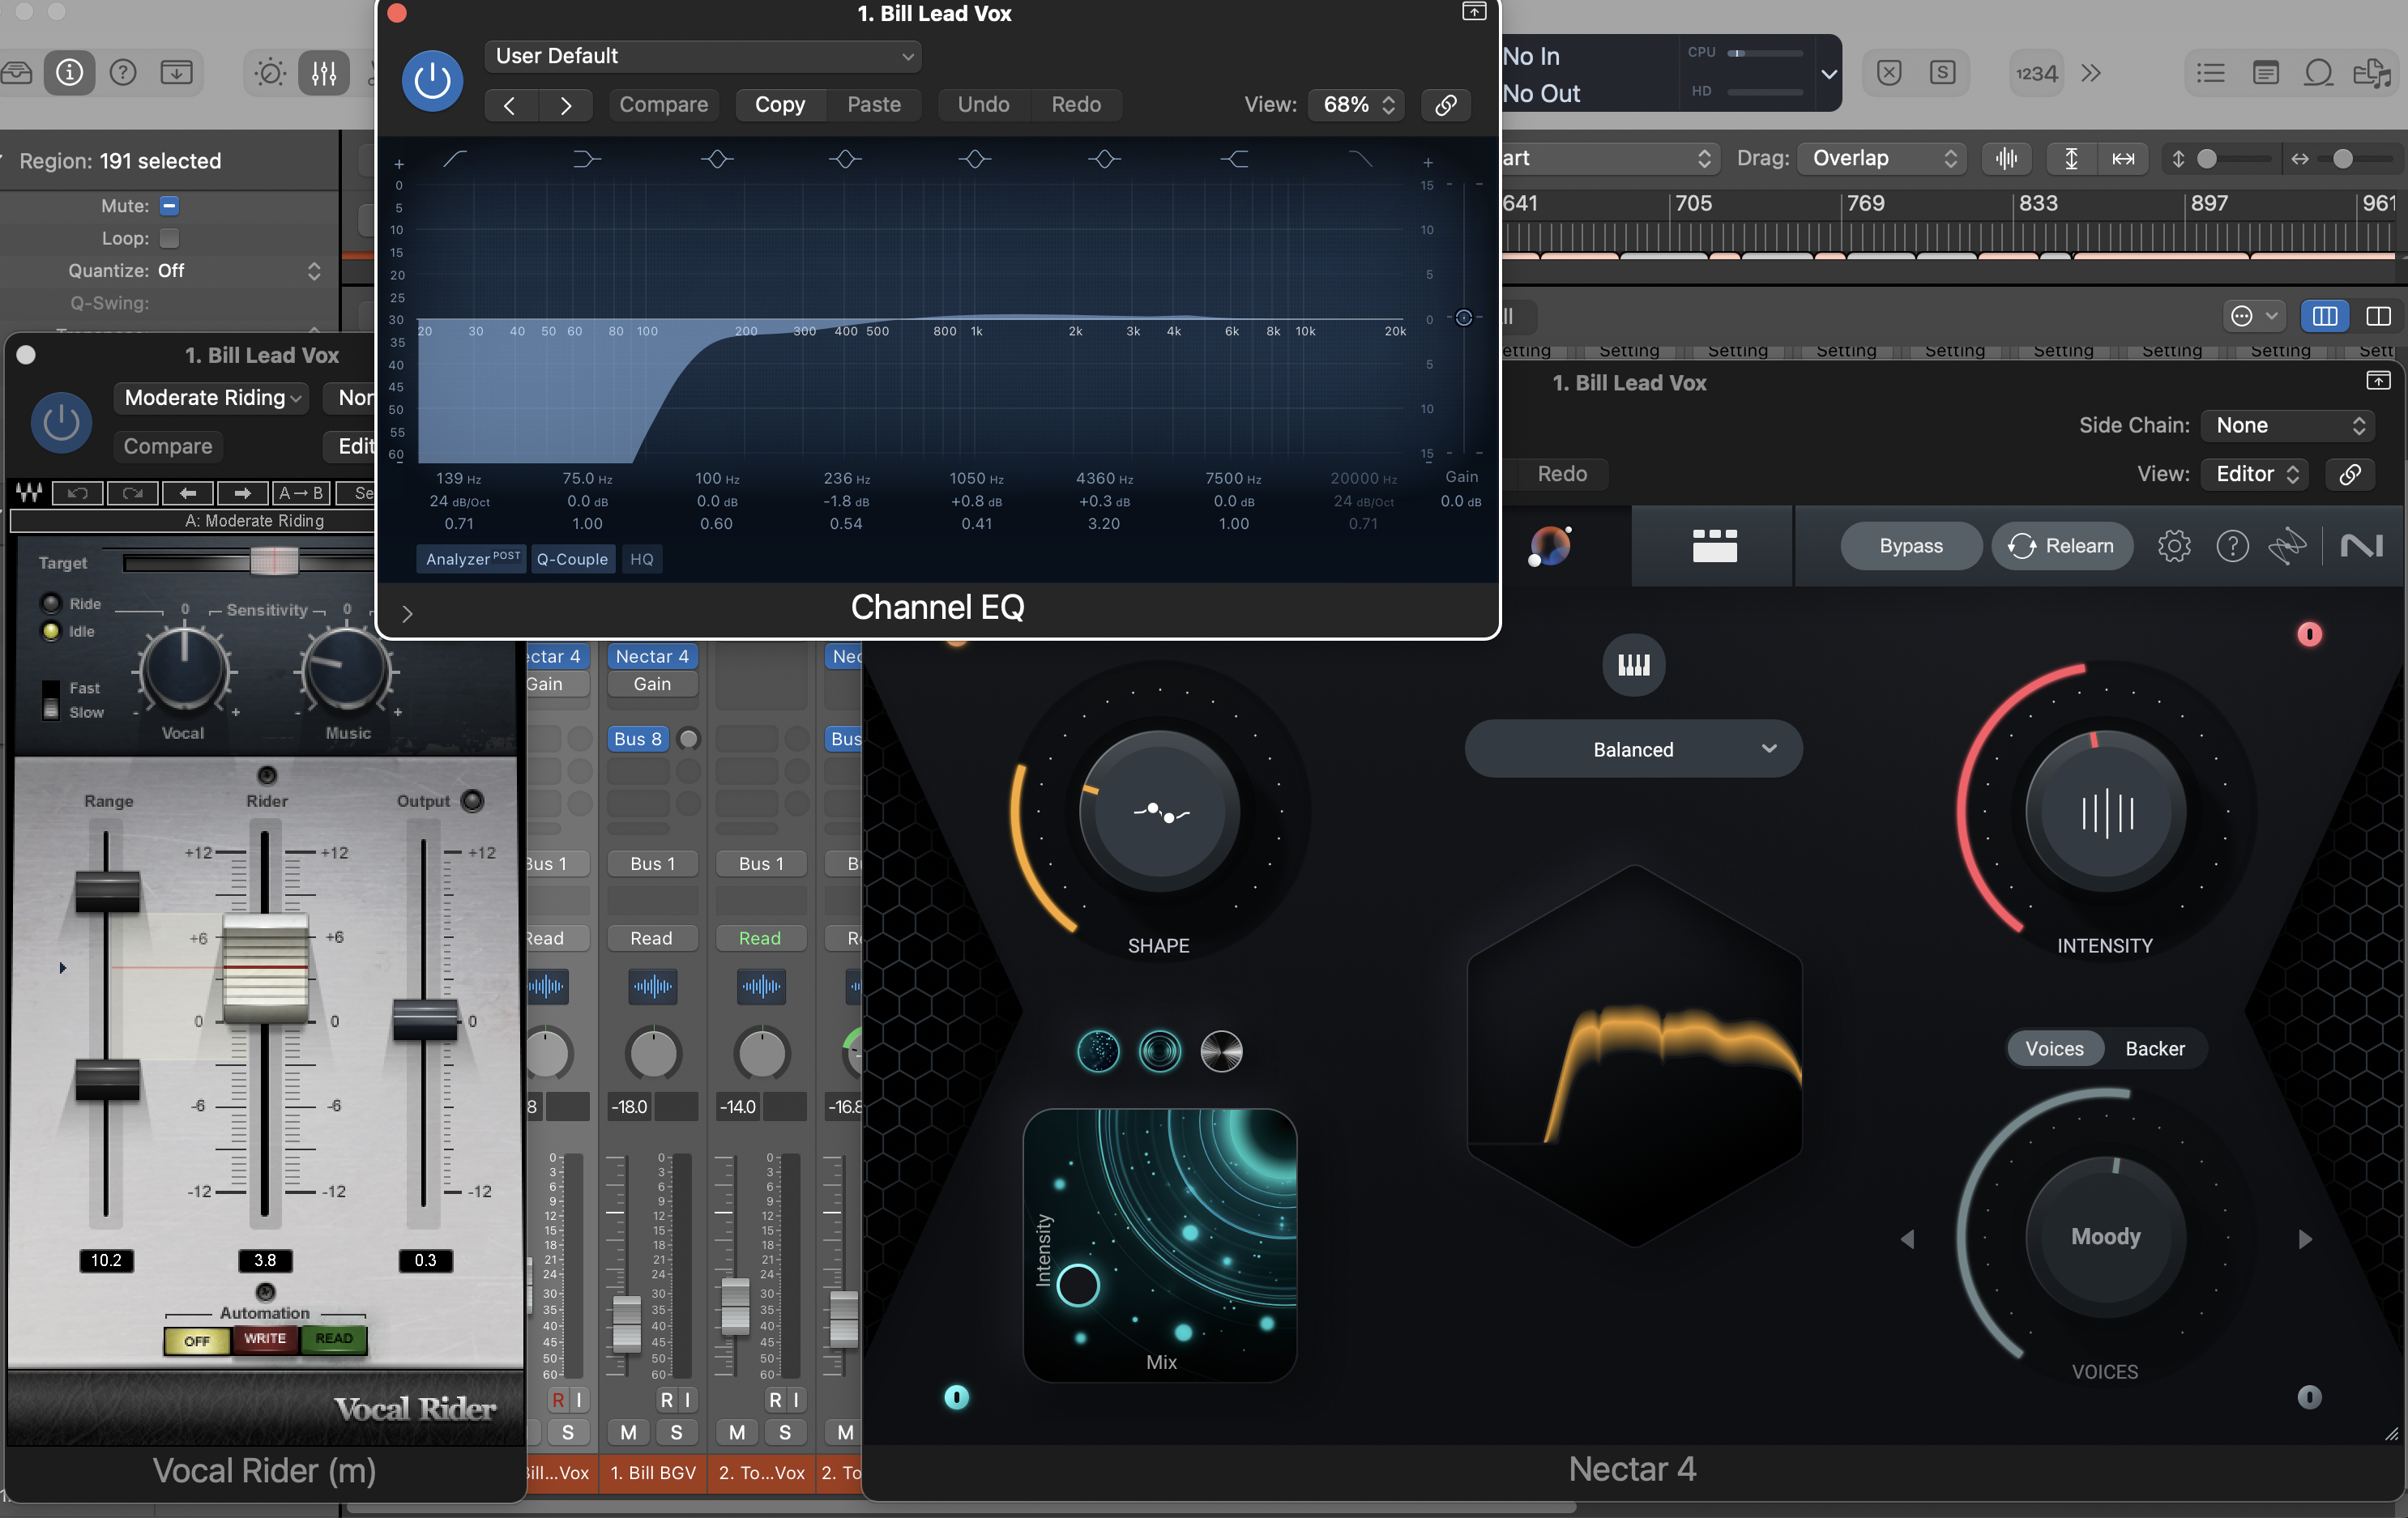
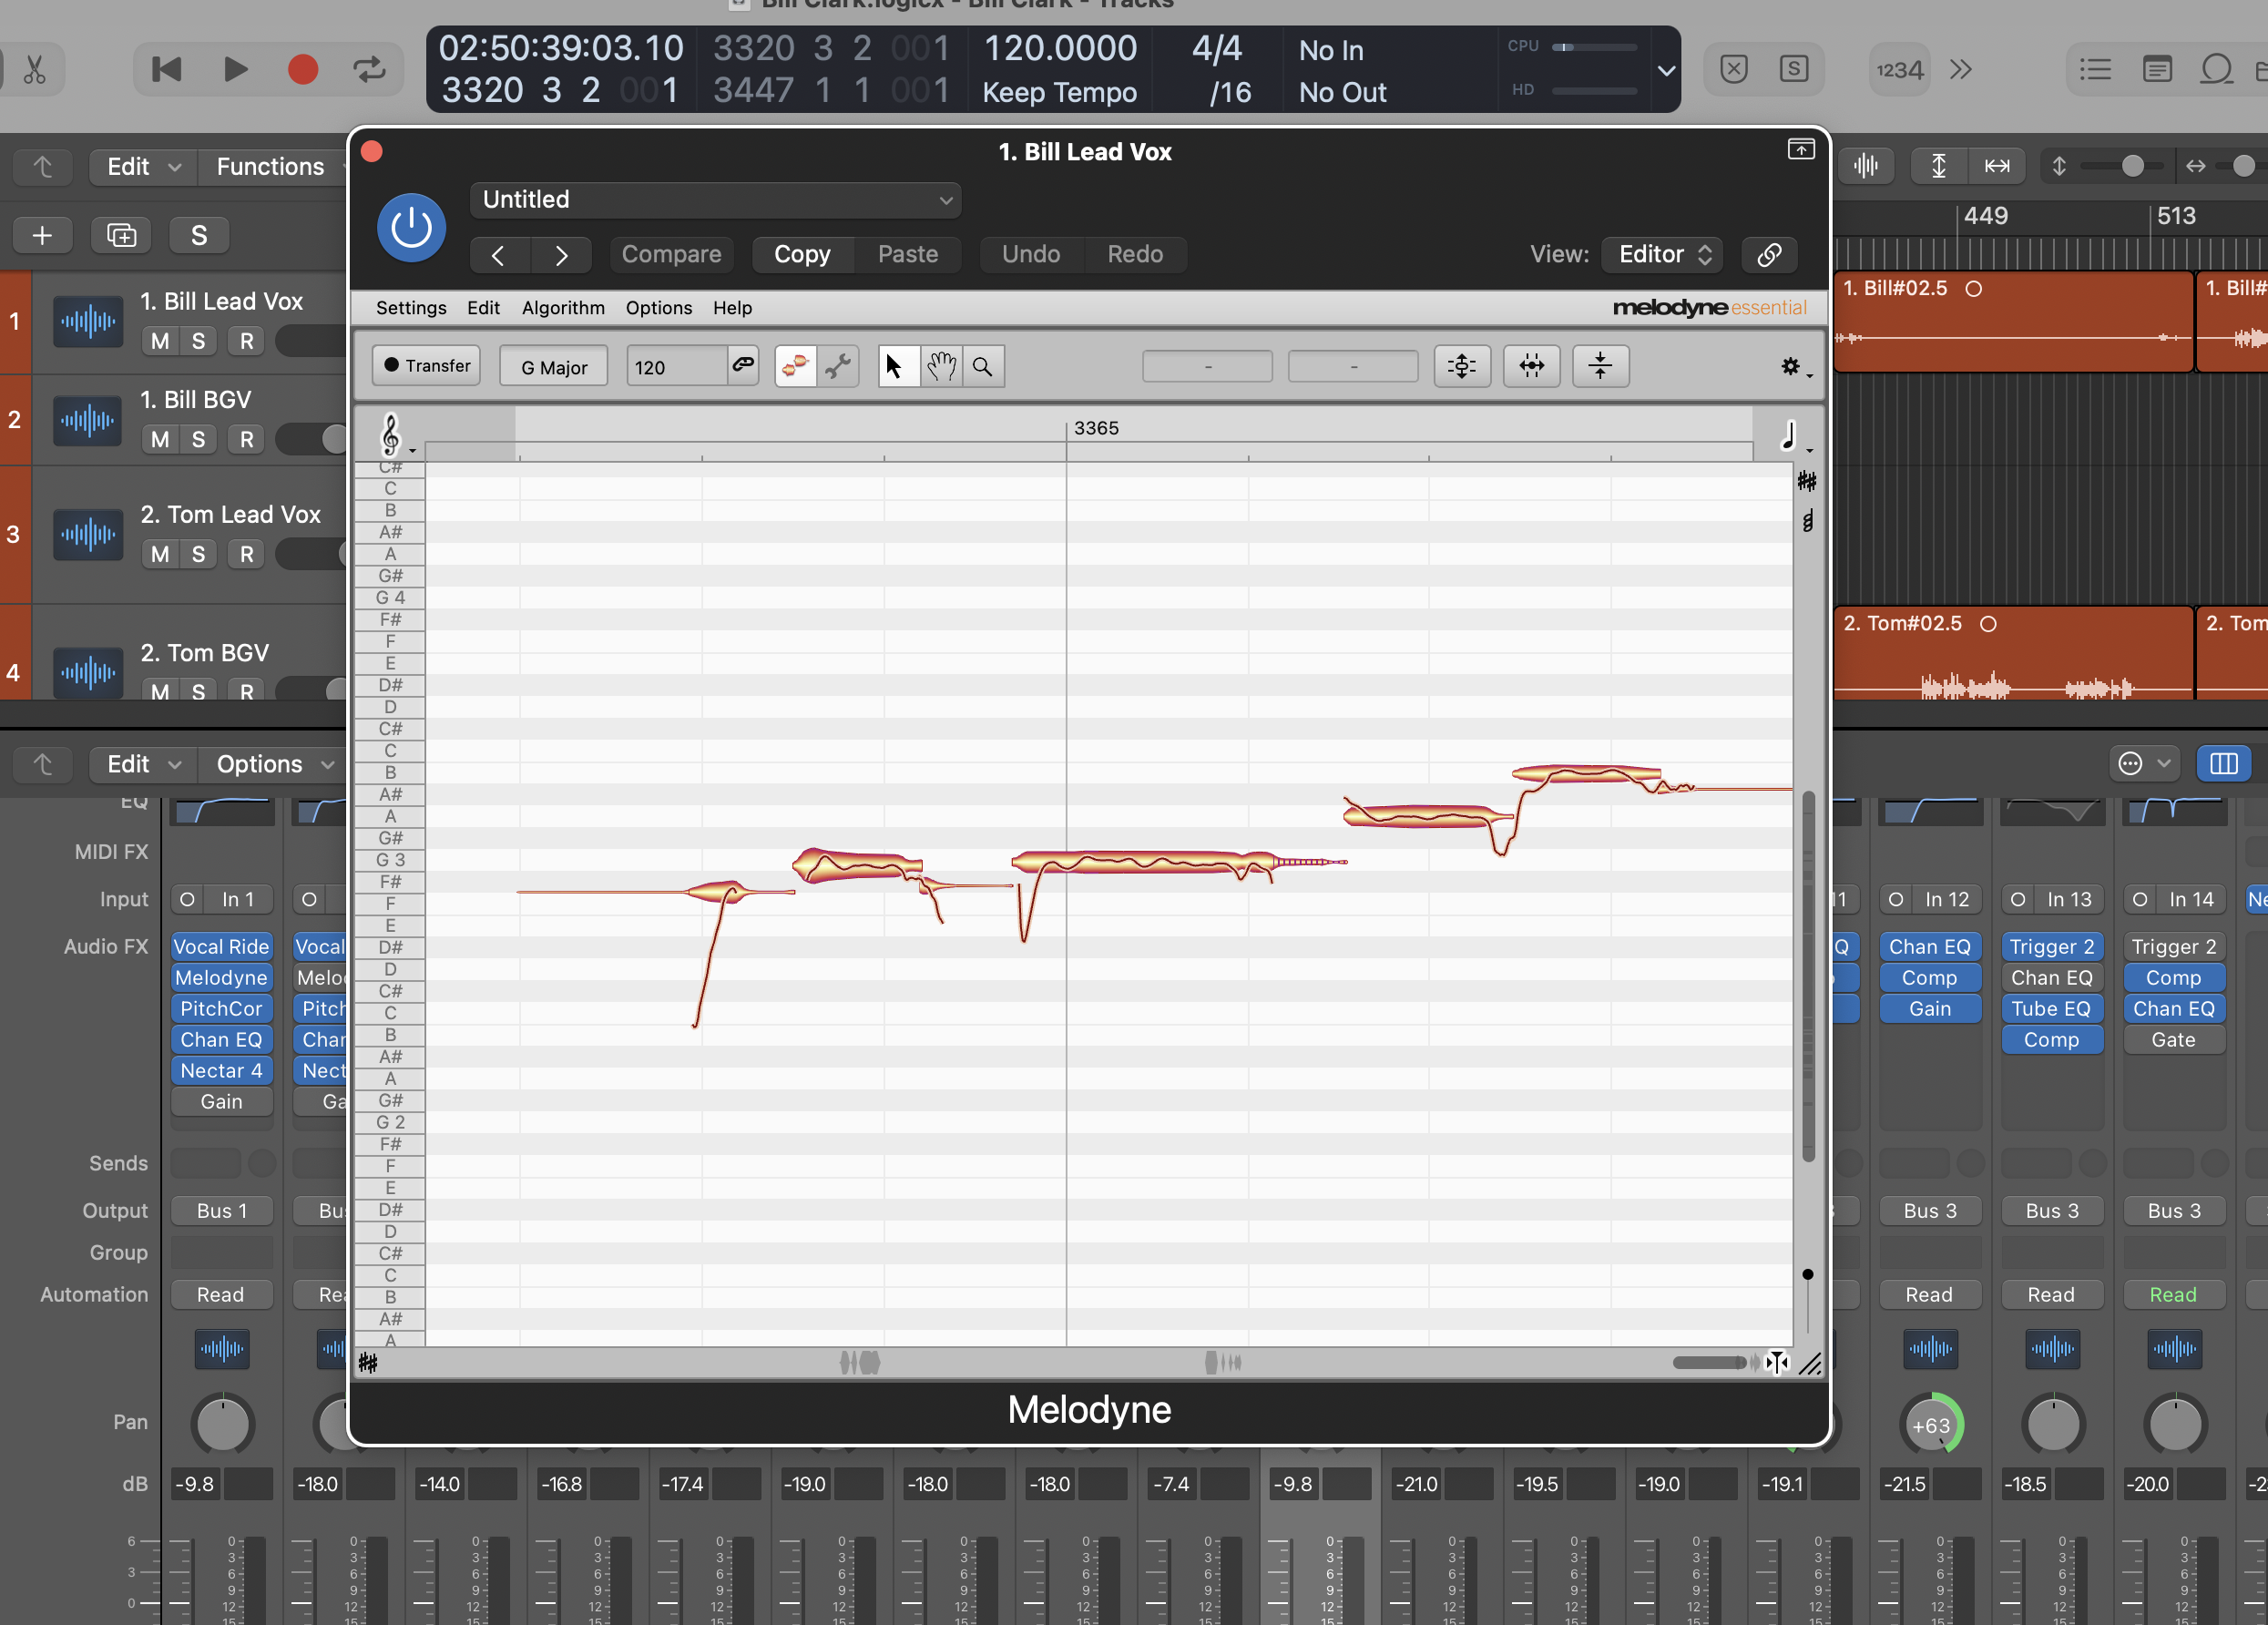
3. Getting each voice in shape: This involves adding eq, rolling off the low end (below 350 hz is typical), adding compression as needed, and sometimes a small amount of reverb or delay. This also involves some general panning of voices, though this will vary from song to song depending on who is singing lead. I also use some general pitch correction as needed. And on occasion I will pitch correct a few individual notes.
In the photograph above you can see that I’m rolling off the low end, adding a “vocal rider” (from Waves audio) to bring up low volume sections and tame high volume sections, and compression and imaging using Nectar 4.
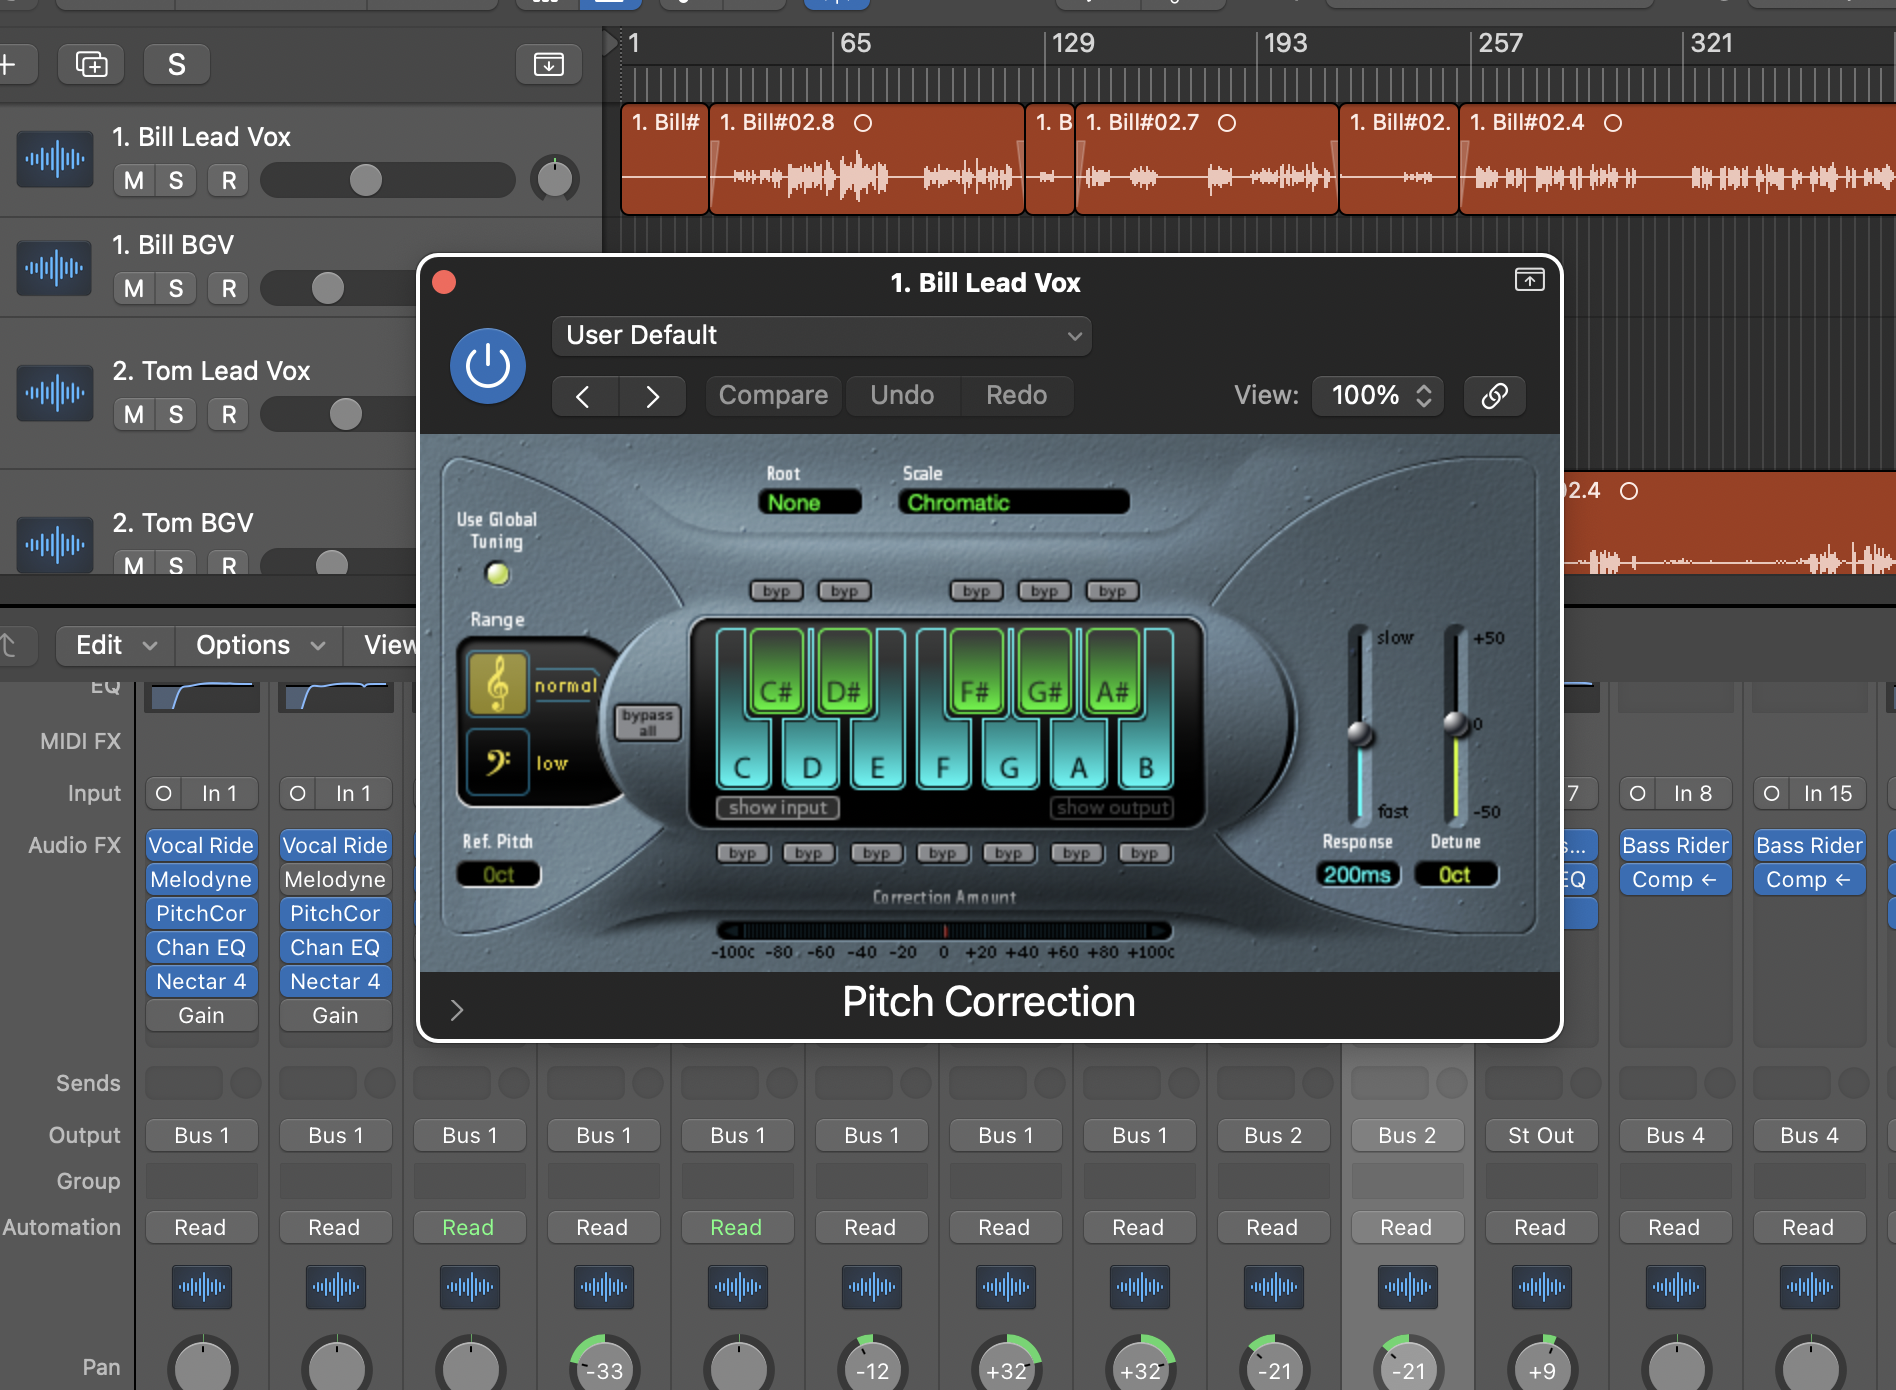
The 2 photographs below show a general chromatic pitch correction tool (from Logic) using “chromatic” setting and a moderately fast response, and individual pitch correction using Melodyne.
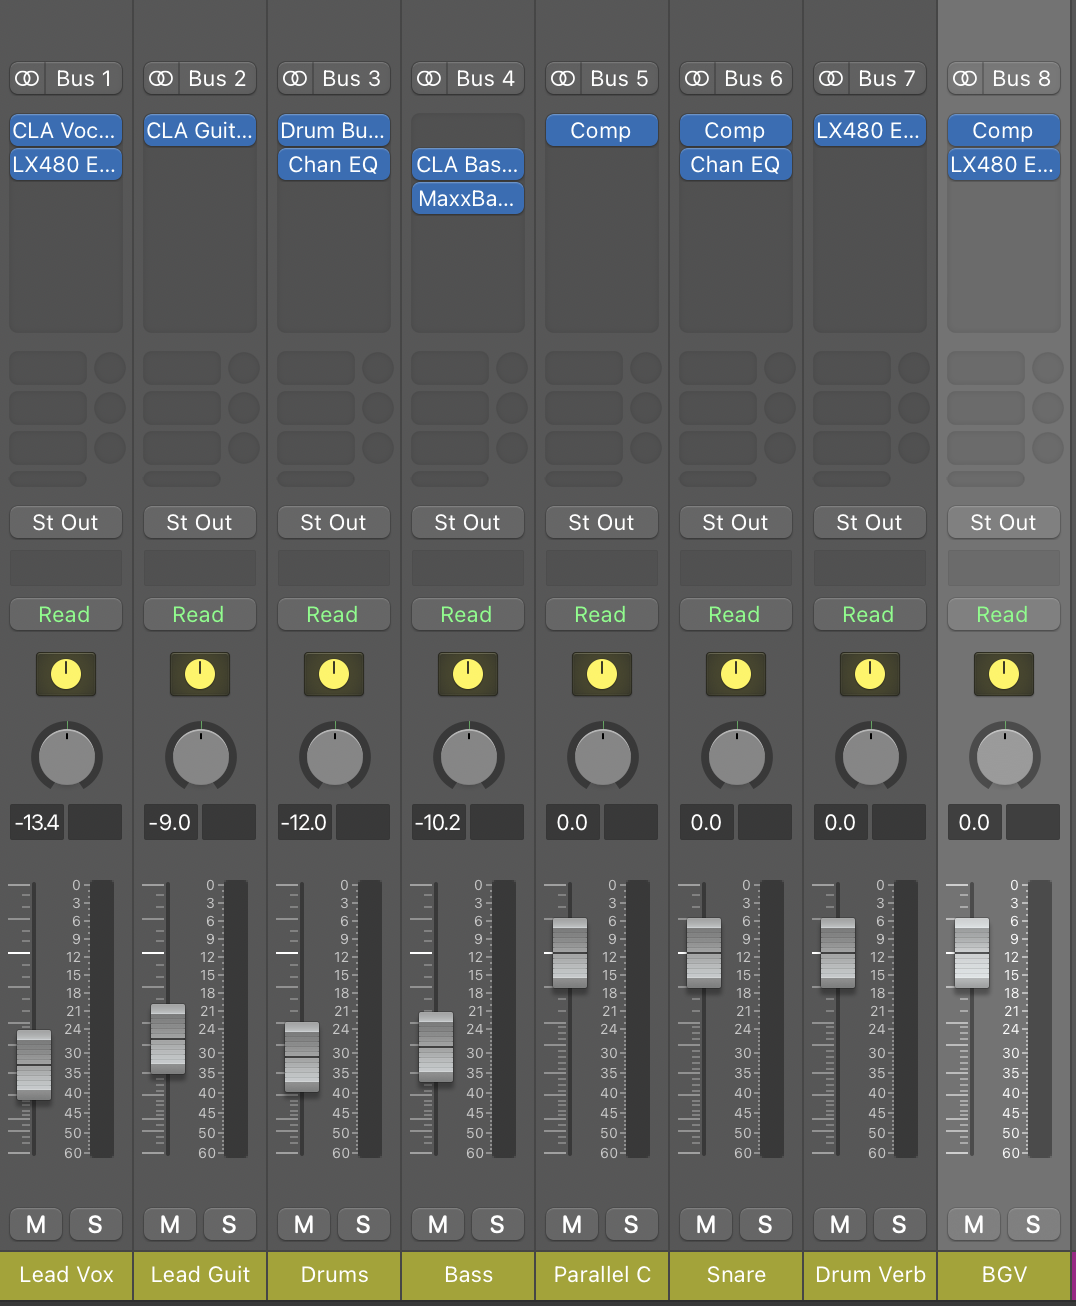
4. Setting up vocal busses: I use a lead vocal buss and a BGV (background vocal) buss. When a singer is singing lead, I buss them through a Lead Singer buss that has a different, more “upfront” and present sound. Those singing background are bussed through buss that is set up for background vocals, with a little vocal doubling, slightly deeper reverb to set them back in the mix a little, etc.
5. Getting drums in shape: This involves adding eq and compression to each drum or drum mic as needed. It also involves “compression-locking” the kick drum to the bass track using a side chain, so that the bass and kick feel “locked” together in the mix. Depending on the quality of drums and the consistency of the drummer, this can take quite a long time. In some instances using “drum replacement” samples will be necessary.
In the photo below, the compressor of the bass microphone is side chained to the Kick which glues them together. Only use 5-6 dbs of audio reduction for this or you’ll get “pumping and breathing” artifacts.
6. Getting the bass in shape: This is a matter of getting the right blend between a DI and microphone so that the sound is what the bass player uses on stage. It also means taking the time to divide the “low end space” of the mix correctly between the kick drum and the bass. Different groups have different sounds in this regard. Some groups have bassists that use bass guitars and amps that grab the territory between 70 and 150 hz. Others have bassists that use lots of “sub-bass” and like their sound to control the space from 60 hz down. This means that the kick will be equalized for the higher sonic territory.
7. Setting up drum busses (see buss photo above). I usually set up a “parallel compression” drum buss which is slammed with compression. As needed, I will send small amounts of the snare and kick through this buss to add punch. I then have a “drum reverb” buss, which will make use of a small amount of reverb, mostly for the snare. I also have a “full kit buss” for all but the kick, set up with compression and eq that helps the kit sit well in the mix. If I use multiple snare or kick mics, I will also run snare and kick busses.
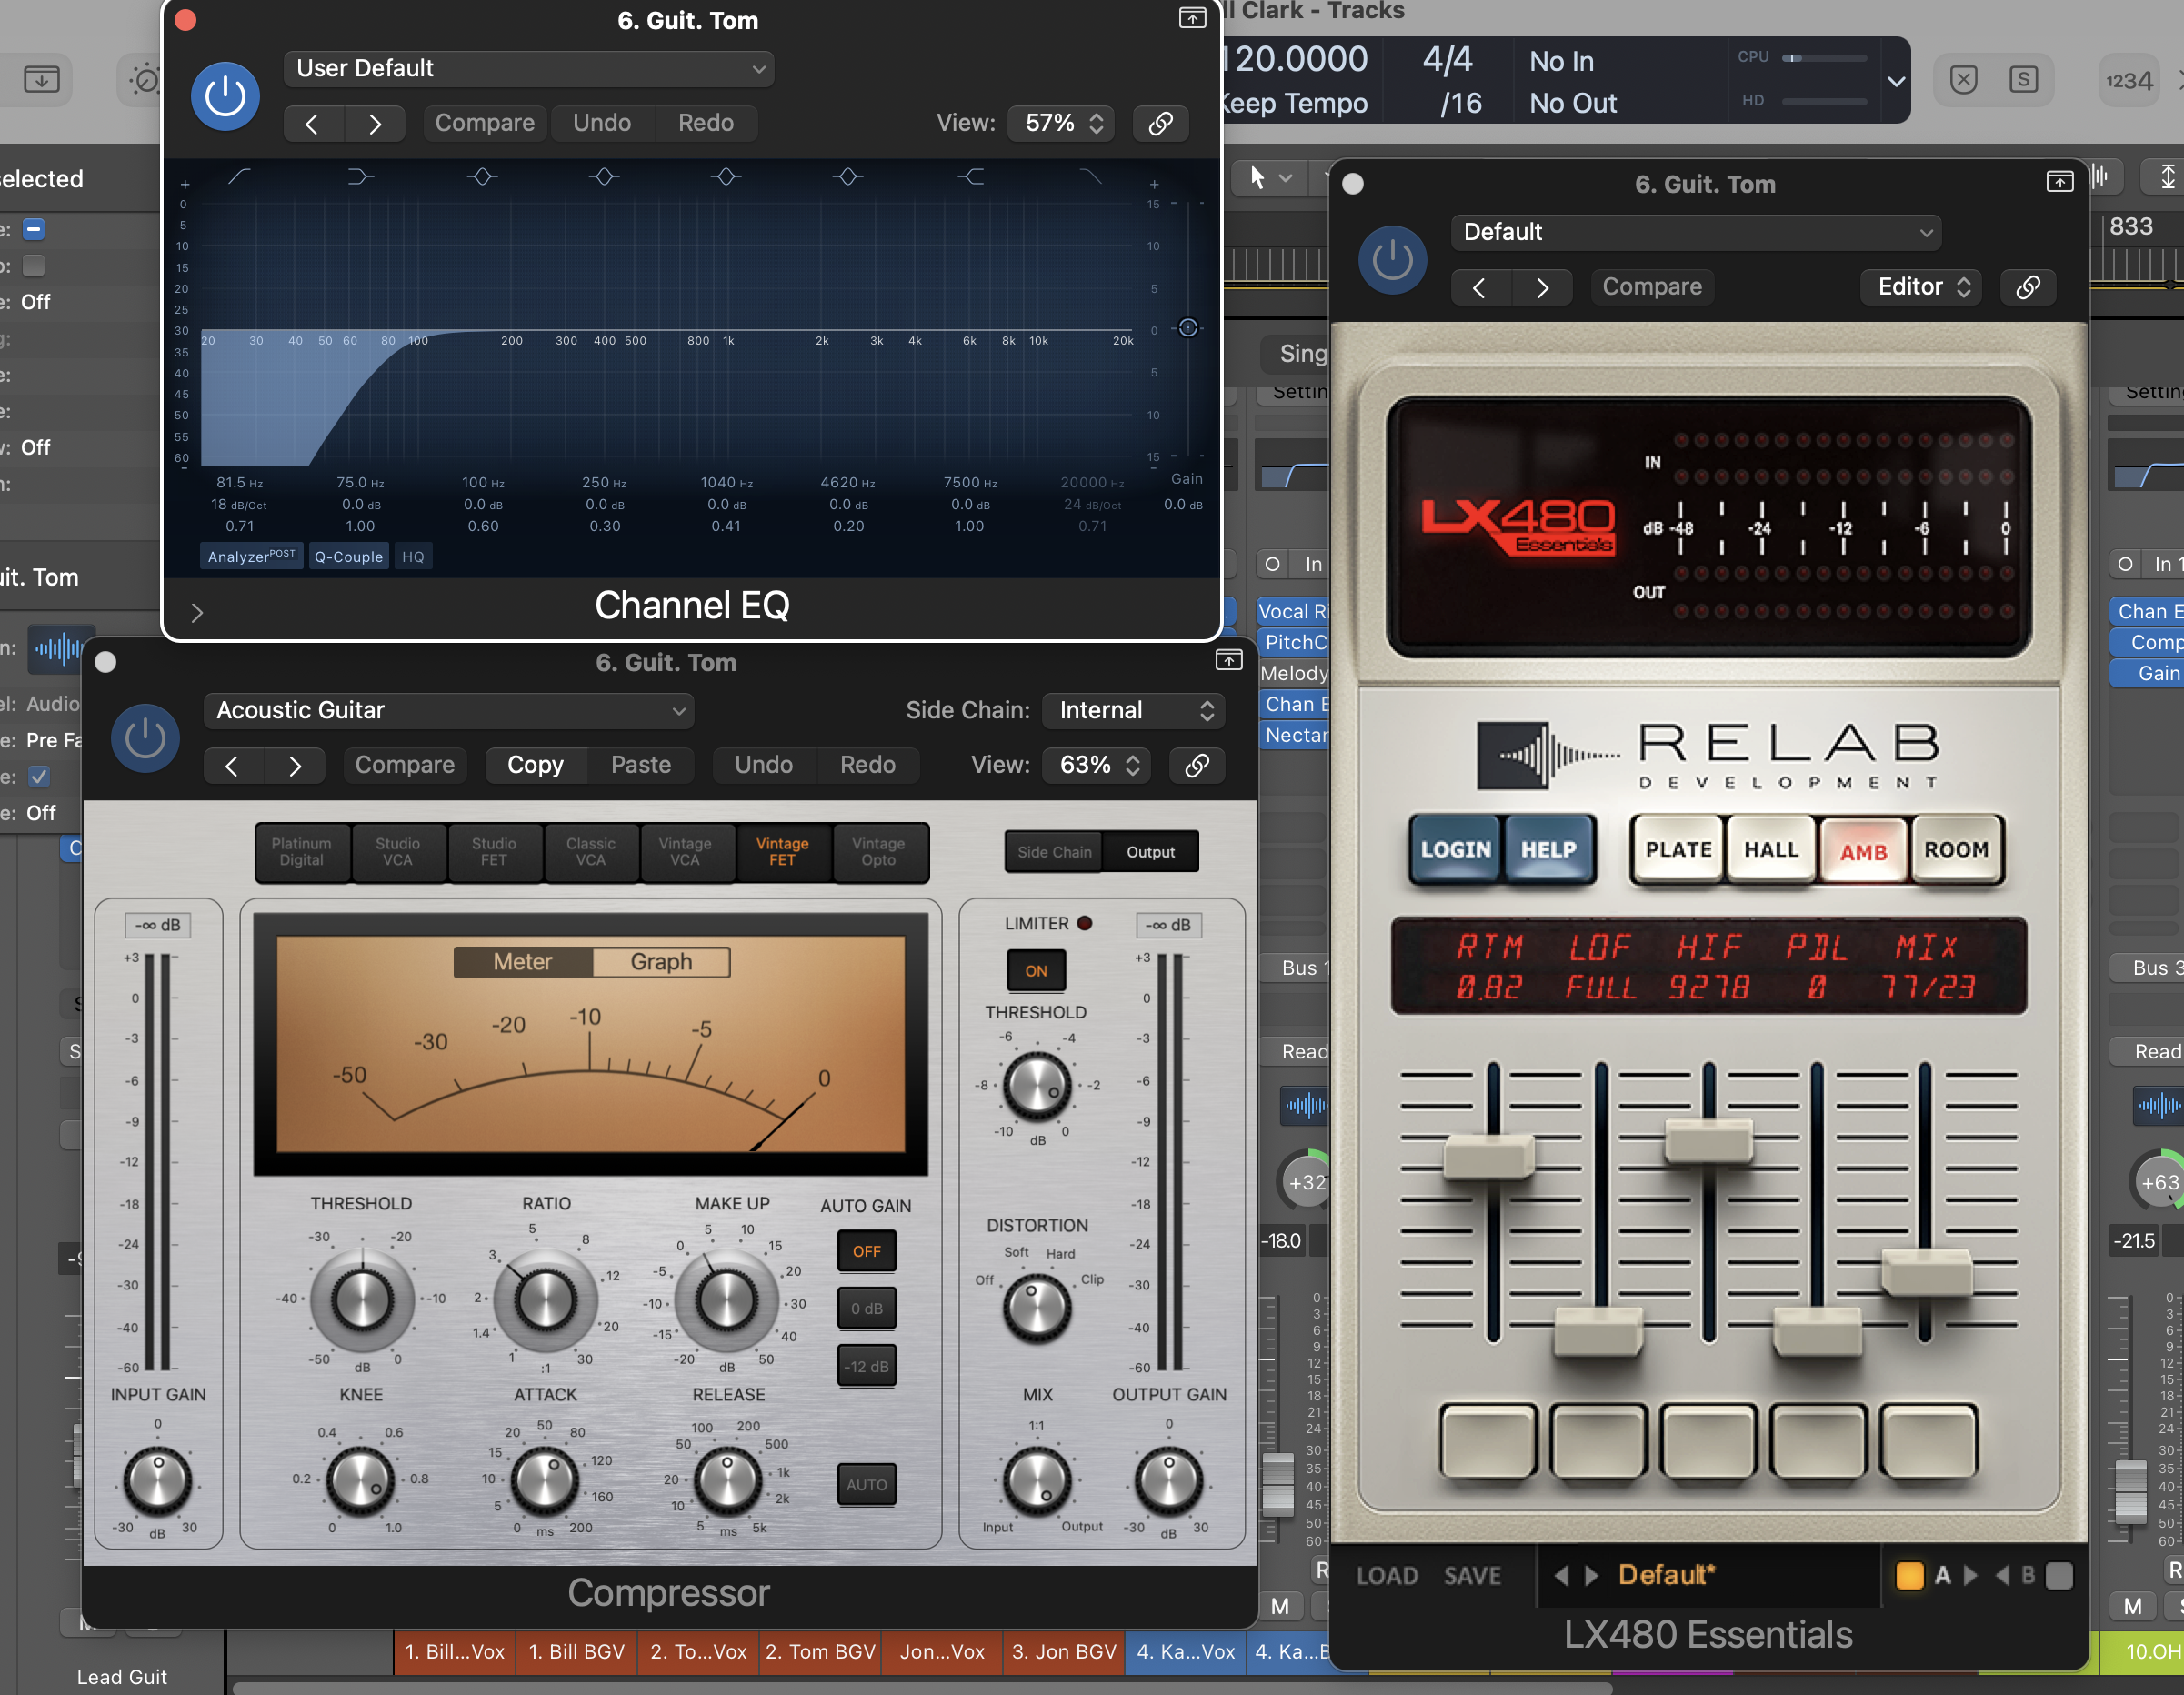
8. Getting the instruments in shape: This varies from instrument to instrument and player to player. For acoustic instrumentalists, this sometimes means rolling off some of the low end (to avoid the accumulation of “low end mud” in the mix). And it can also mean trying to find a clean sound that matches pretty closely what the audience hears, balancing direct boxes and microphones accordingly, and panning in a way that matches the onstage sound. For electric guitarists, the goal is once again to approximate as nearly as possible their onstage sound. For keyboardists, a stereo feed needs to be equalized and panned realistically to match onstage sound.
In the photo below, I’m rolling off the low end on Tom’s acoustic guitar, adding a little soft compression, and some gentle room ambience reverb.
9. Setting up instrument busses (see buss photo above): I usually have “lead guitar” and “rhythm guitar” busses set up, so I can make quick adjustments per song as needed. I’ll also have busses for electric guitars, keyboards, and other instruments, making sure that all instruments with more than one form of capture is mixed and easy to adjust in the mix.
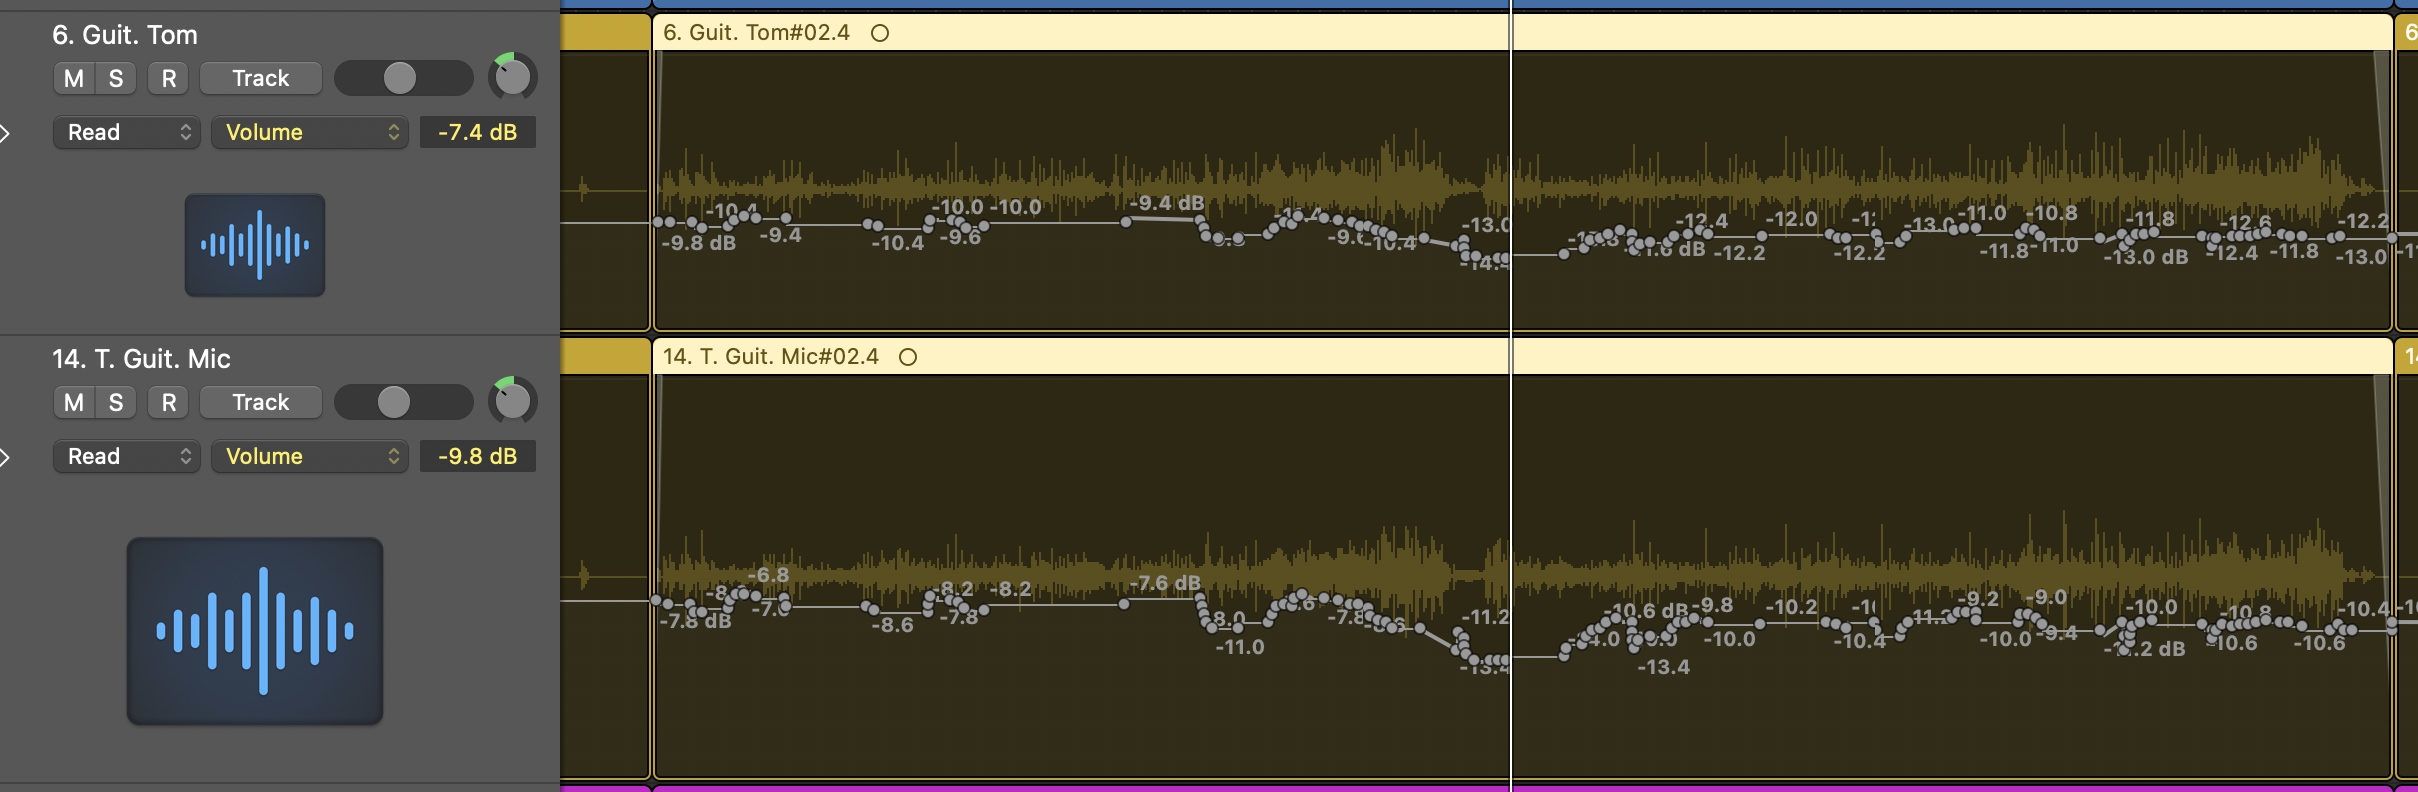
10. Setting up the basic template for each song. Softer songs will require different mixes typically. When a guitarist changes instruments or volume level, decisions have to be made regarding how to bring the instrument up or down in the mix in a way that matches the player’s onstage intentions. Some automation might be required for an instrument when the player has been too erratic with a volume pedal onstage, etc. When multiple singers sing lead on different verses, their voices have to be cut and pasted onto lead or background tracks (see above). Many decisions are required for each song. It is NOT simply a matter of using the previous song’s mix.
In the photo below you can see the automation that was required on Tom’s acoustic guitar on a song where his volume pedal usage seemed to create a few volume issues.
11. Bouncing each song. Once the mix is done, each song must be bounced at a level that allows plenty of head room (at least 6 db) for mastering.
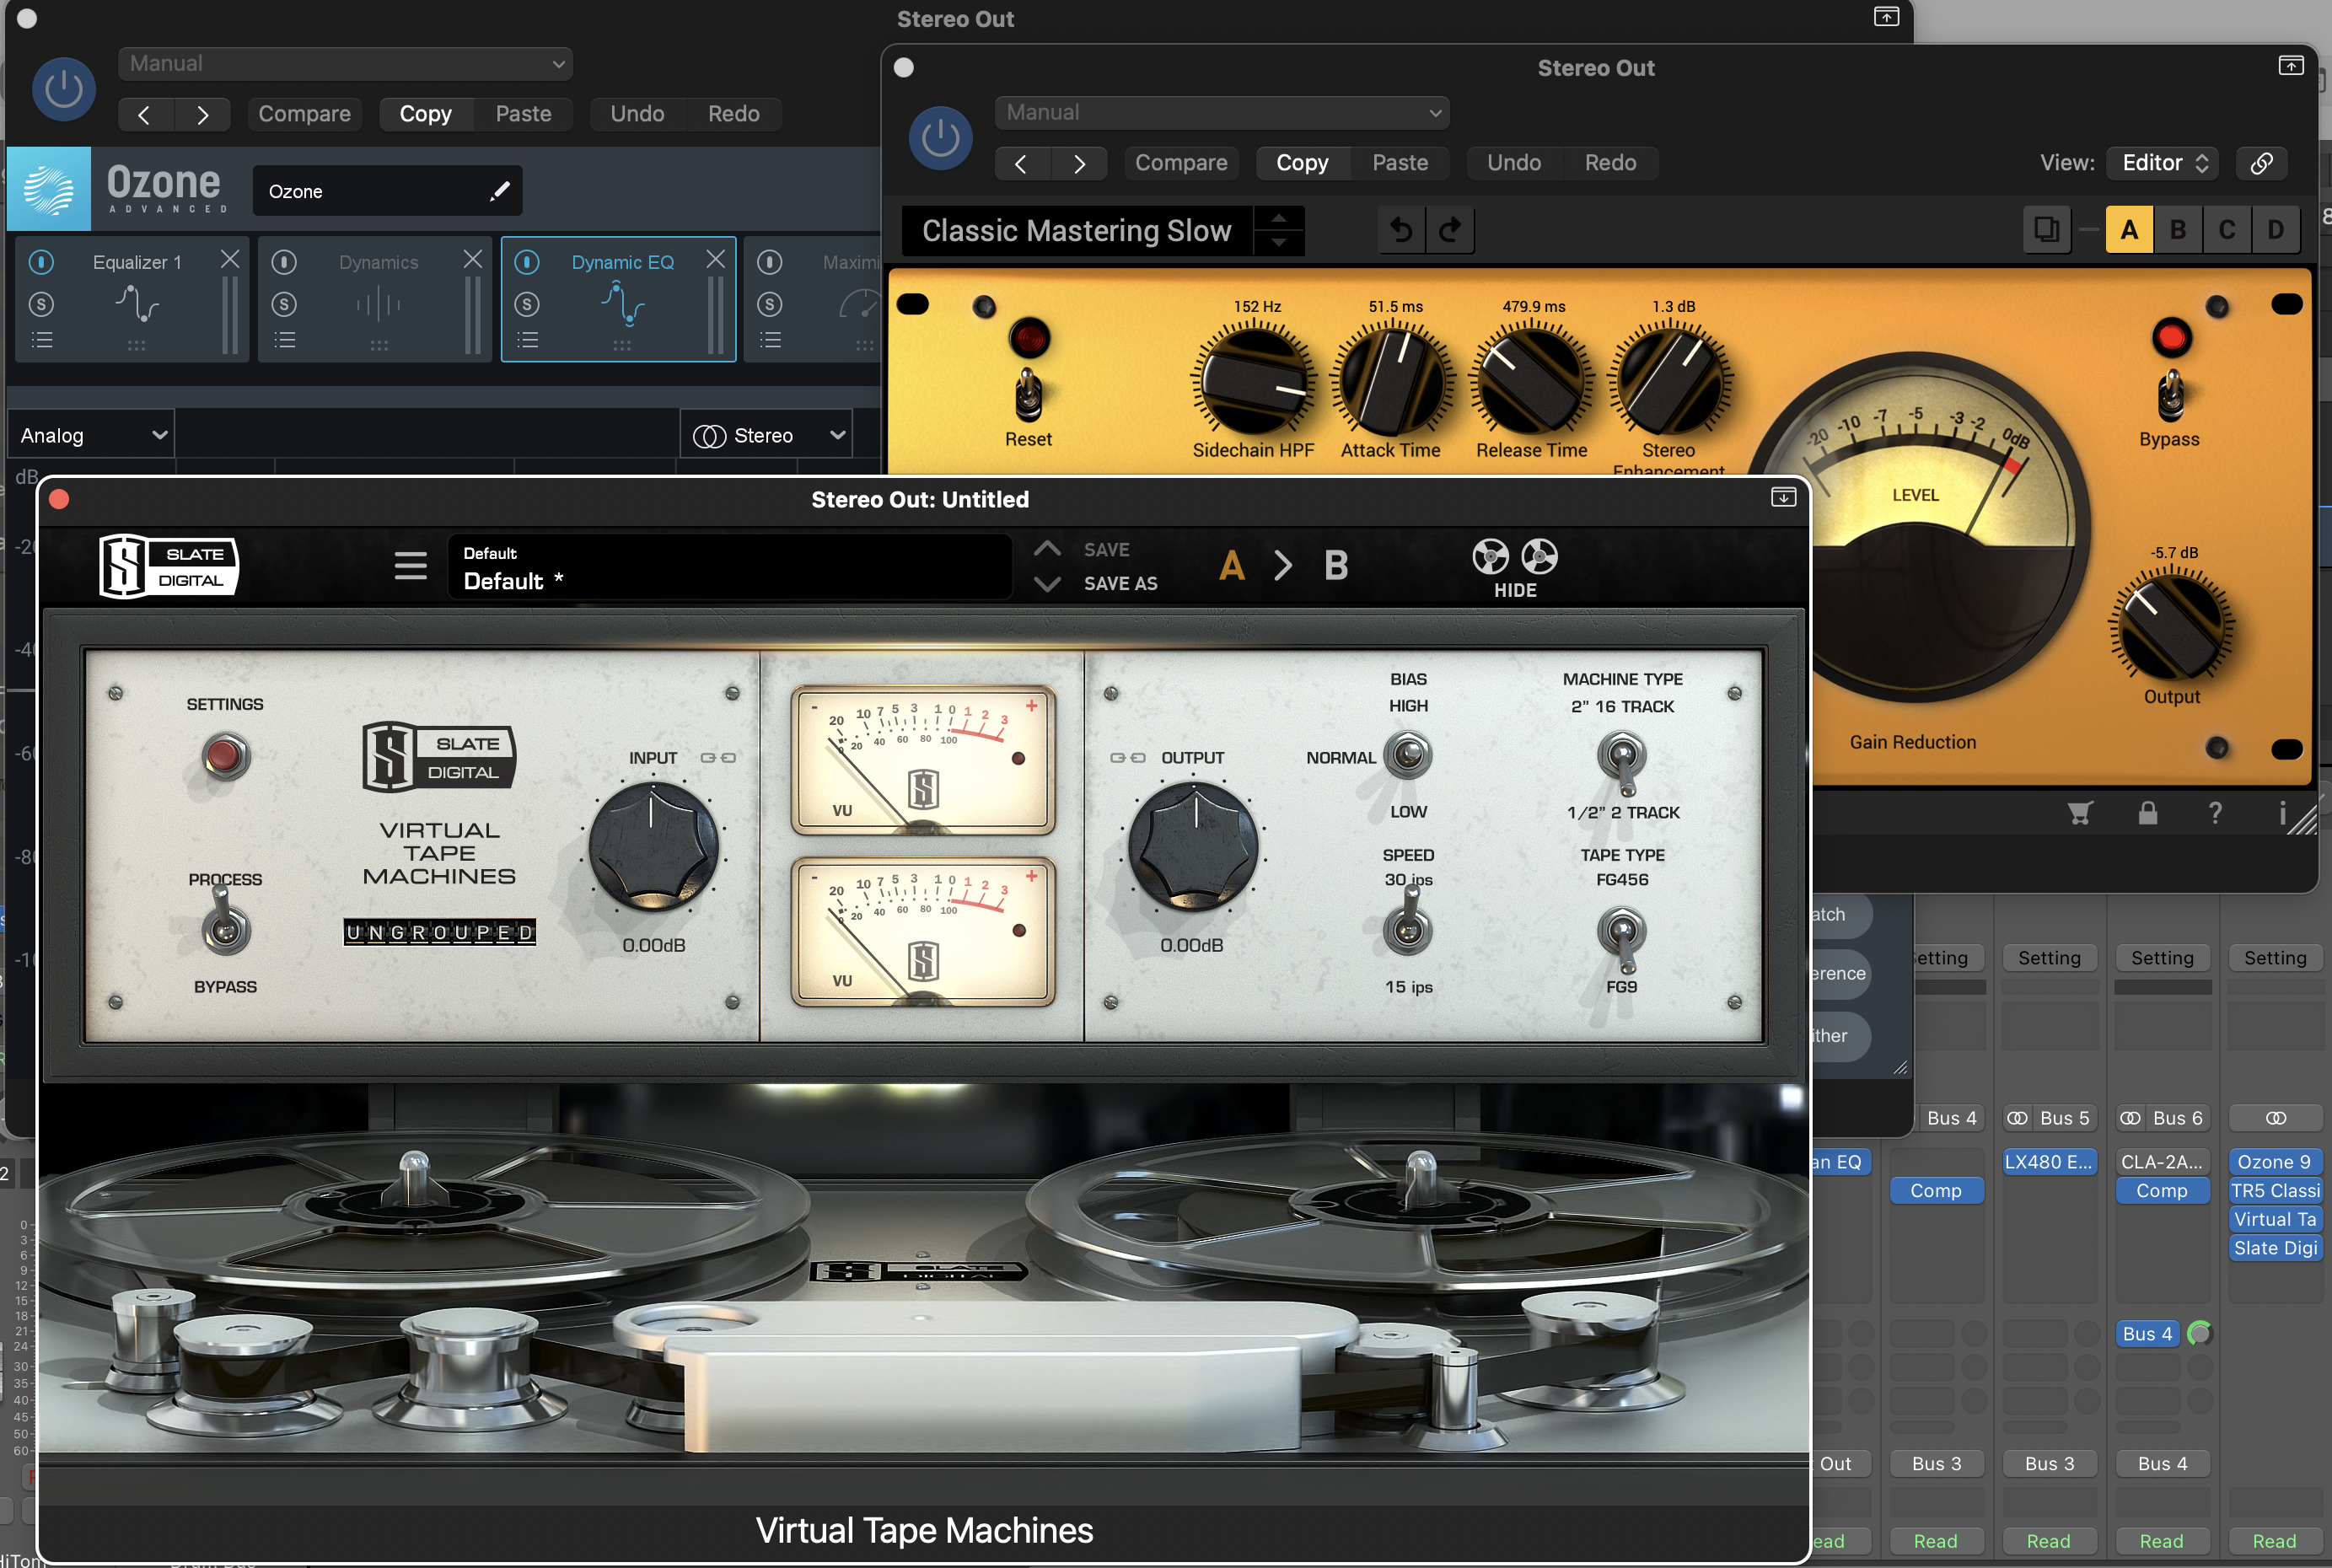
12. Mastering each song. Here you can set up a basic mastering template using eq, imaging, dynamic eq, compression, tape saturation, and a finalizer to bring the song up to appropriate volume for streaming or whatever final target is needed. This will need a little tweaking for each song depending on its volume and style. I usually wind up with an entire mastering “list” for each live performance in one template grid. I also usually add about 2 seconds of silence at the end of each song, making sure that it is faded nicely as well.
In the photo below you can see that I’m using a dynamic eq.(part of Izotope’s mastering suite), tape saturation plugin (from Slate), and a mastering compressor (from IK Multimedia).
Each song occupies a stereo track
in the mastering template.
ABOVE AND BEYONDTHE CALL OF DUTY
What I don’t do (but could) when mixing a live performance. Some of these things I’m glad to do for a few choice songs that a band or artist might want to perfect. I assume that a roughly 30 song live gig might only have between 3-10 songs that an artist might want to “dig deeper” on for a CD, or some other presentation.
Extensive pitch correction.
Fixing the performance. This might mean repairing a lead, bass line, drum hit (errant kick for instance), vocal performance, etc. In some instances this can be accomplished by flying something into a performance from somewhere else (a kick hit or bass note, for instance). In other instances, however, the artist might have to come into the studio and redo a part. This is not always an option if microphone bleed issues are too overwhelming. Fixing a guitar lead, for instance, often can only be done for a few notes and not the entire lead. It’s also possible to make the background vocalists and lead singer enter and release together. This sometimes requires using Izotope RX Rebalance on the vocal tracks to remove most of the music bleeding into vocal mics prior to realignment to avoid adding delay or artifacts to the vocal tracks.
Changing the mix. This might involve adding more reverb, adjusting volume or pan, and so on as per the artist’s taste.
Credenda, a wonderful close harmony family band that I recorded, just posted a promotional video in which they use three songs that we recorded in the studio as background music behind a montage of pictures and videos of the band playing in various situations.
Instead of trying to create videos for each song that attempt to either tell the story of the song, or create suggestive imagery about a song, the goal seems to be celebrating the individual artists and the family as a kind of musical community.
After watching it a few times, I decided that it is a fascinating concept! See what you think.
Many bands that play mostly in small to medium sized clubs will have YouTube or blog posts of their music. Often the videos are fine but the audio will be poor. Most computer video programs (think QuickTime, IMovie, etc.) will allow you to strip audio and insert a good recording of your music to sync with your video. Although a good two-track stereo recording can be an improvement, a multi-track recording gives you many more options which, if mixed correctly, can provide a first-rate, natural (not over hyped) listening experience to go with the video.
There are a few things that have helped me get a better-quality multi-track recording over the years. I’ll share some of these below. Then, I’ll give an example of the kind of recording I’m talking about by providing an example of a recording of Louisville band, Palo Verde.
Use the right microphones. Some singers want to use their own microphones. It is important to check ahead of time to see what these microphones are. While some will work well, others will produce significant mixing issues. The same is true for drum mics, etc. Be sure to double check! Super or hyper cardioid mics are best because they work to eliminate noise from other instruments and especially floor monitors (see #2 and #3 below). Remember that when you’re trying to get a natural live sound you don’t need to put a microphone on every drum unless the band normally does so for the house mix. A single overhead (Omni?) microphone, kick, and snare mic will be plenty for many bands and less intrusive.
Tweak monitor placement. While in-ear monitors permit the best recordings, most bands still use floor monitors. These should be placed well behind the microphone’s sound field. This is usually not difficult with singers. It is most difficult when a drummer uses a floor monitor, and it faces upward toward the overhead microphones. This means that the monitor mix will intrude on the drum’s overhead mix and render the overheads virtually useless. I usually bring along a spot monitor that I can place near the drummer, facing away from the overhead microphones.
Control monitor mixes if possible. If the band is in a space with walls on either side and a wall in back, it will help if the front of house mixing engineer can run individual monitor mixes to each musician on stage, providing only the minimum of what they need. Full house monitor mixes at high volume can bleed into all of the stage microphones and wind up competing with your overall mix in a lot of ways (especially by creating out-of- phase issues) so keeping them as modest and targeted as possible will help later down the line. If band members are used to in-ear monitors this is best, of course!
See if you can position musicians with the vocal stereo field in mind. If a band has three-part harmonies and those singers all stand at the front of the stage, it can help if these singers are not bunched up on one side. You will likely want to mix them to left and right, so have them stand on stage left/right if possible. This is helpful also because of the drum-bleed that comes through on the vocal mics. When mixing, the stereo field for the drums can be disoriented or out of phase if you are mixing a singer to the opposite side of the mix from where they stood on stage. Most musicians will honor this request, knowing its only for one night, if it is a huge change.
Don’t fret the room microphone. If you use a room microphone for small to medium size club gigs, you’ll only use it for applause and room noise before and after songs. Otherwise, you’ll hear table conversations, etc. in the mix.
Assess (and use) direct inputs for acoustic instruments. Most artists use direct inputs from pickups for guitars, mandolins, harmonicas, etc. these days. Some are excellent. Others are not so good. Use them no matter what the quality. Why? Because they are what the band “sounds like” and your job is to get that sound. That said, in some cases, you might want to stick a directional mic in front of an instrument, just to provide the option later of improving the sound. And remember, a good sounding direct input eliminates microphone bleed!
The more you can control the better. In order to have maximum control over the quality of recording I prefer getting a direct feed into my own preamps and converters. Although many affordable mixers will now do multitrack recordings (Midas Mr18, Mackie Onyx, etc.) I prefer to use better quality preamps and digital to analog converters. For that I use a passive stage box that is a splitter, with one cable running to the bands mixer and the other running directly into my preamps and converters. This allows the band’s engineer to do his/her thing unimpeded while I do mine. When using a passive splitter, it is a good idea to carry along a few inline phantom power supplies and several good DI boxes to help with any ground lift issues. If you have the money and want to be sure you have the tools to get a good isolated sound and avoid compatibility issues with the house mixer you can avoid a passive splitter and get a few transformer isolated splitters such as the ART S8 and the cables to get from the front of house to the splitters and to your recording rig. I like my passive splitter because it has the cables built in and is easier to set up and haul. My basic converters and preamps are the Focusrite Clarett + series. I love the clarity and detail of the converters and the preamps sound great for just about everything. If I need other preamps I can bring them along.
Mix to reproduce the live sound! The number one rule for mixing comes down to avoiding PD (plugin disease). When you have good tracks, it is tempting to add lots of effects (reverbs, delays, compression, etc.) that were NOT in use live. I see my job as reproducing a true to life recording that mirrors what the audience was actually hearing. When someone who attended the gig hears the recording as the audio for a YouTube they can say, “Wow, that’s just how the band actually sounded!”
I recently had a chance to record Louisville’s Palo Verde at an outdoor venue called Bud’s Tavern. The recording was not made for video purposes, so live video is not available here. Here’s an audio track from that event, however, to provide a feel for the kind straight-forward enhanced “live sound” I’m talking about. You’ll want to listen on headphones or good speakers to appreciate the difference between this sound and a simple iPhone or two-track stereo recording.
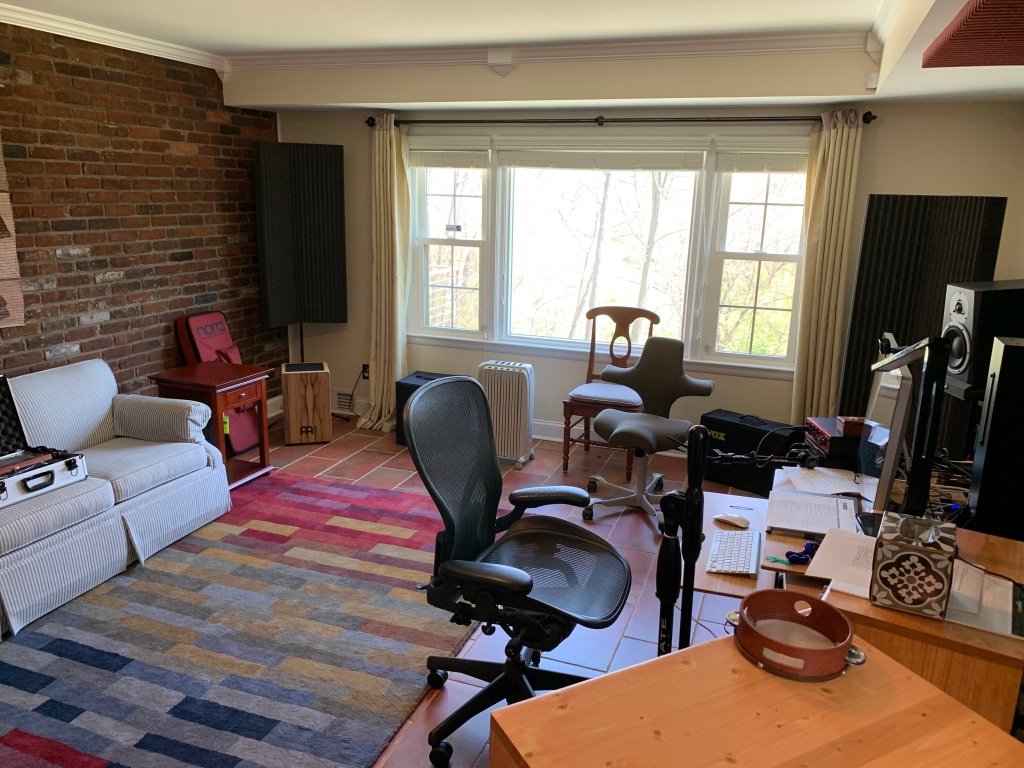
When we moved to Louisville from Nashville I went from a larger space to a smaller setup. Basically I now have a control room shared with a small isolation booth for vocals, acoustic instruments, etc. and a second room next door for tracking drums, and other loud instruments. There are also several small rooms and closets nearby where amplifiers can be isolated when groups want to track live. The setup is small, but still large enough to do live work if needed. The floor is on a slab, and the windows are treated with “Indows” that improve room isolation a lot.
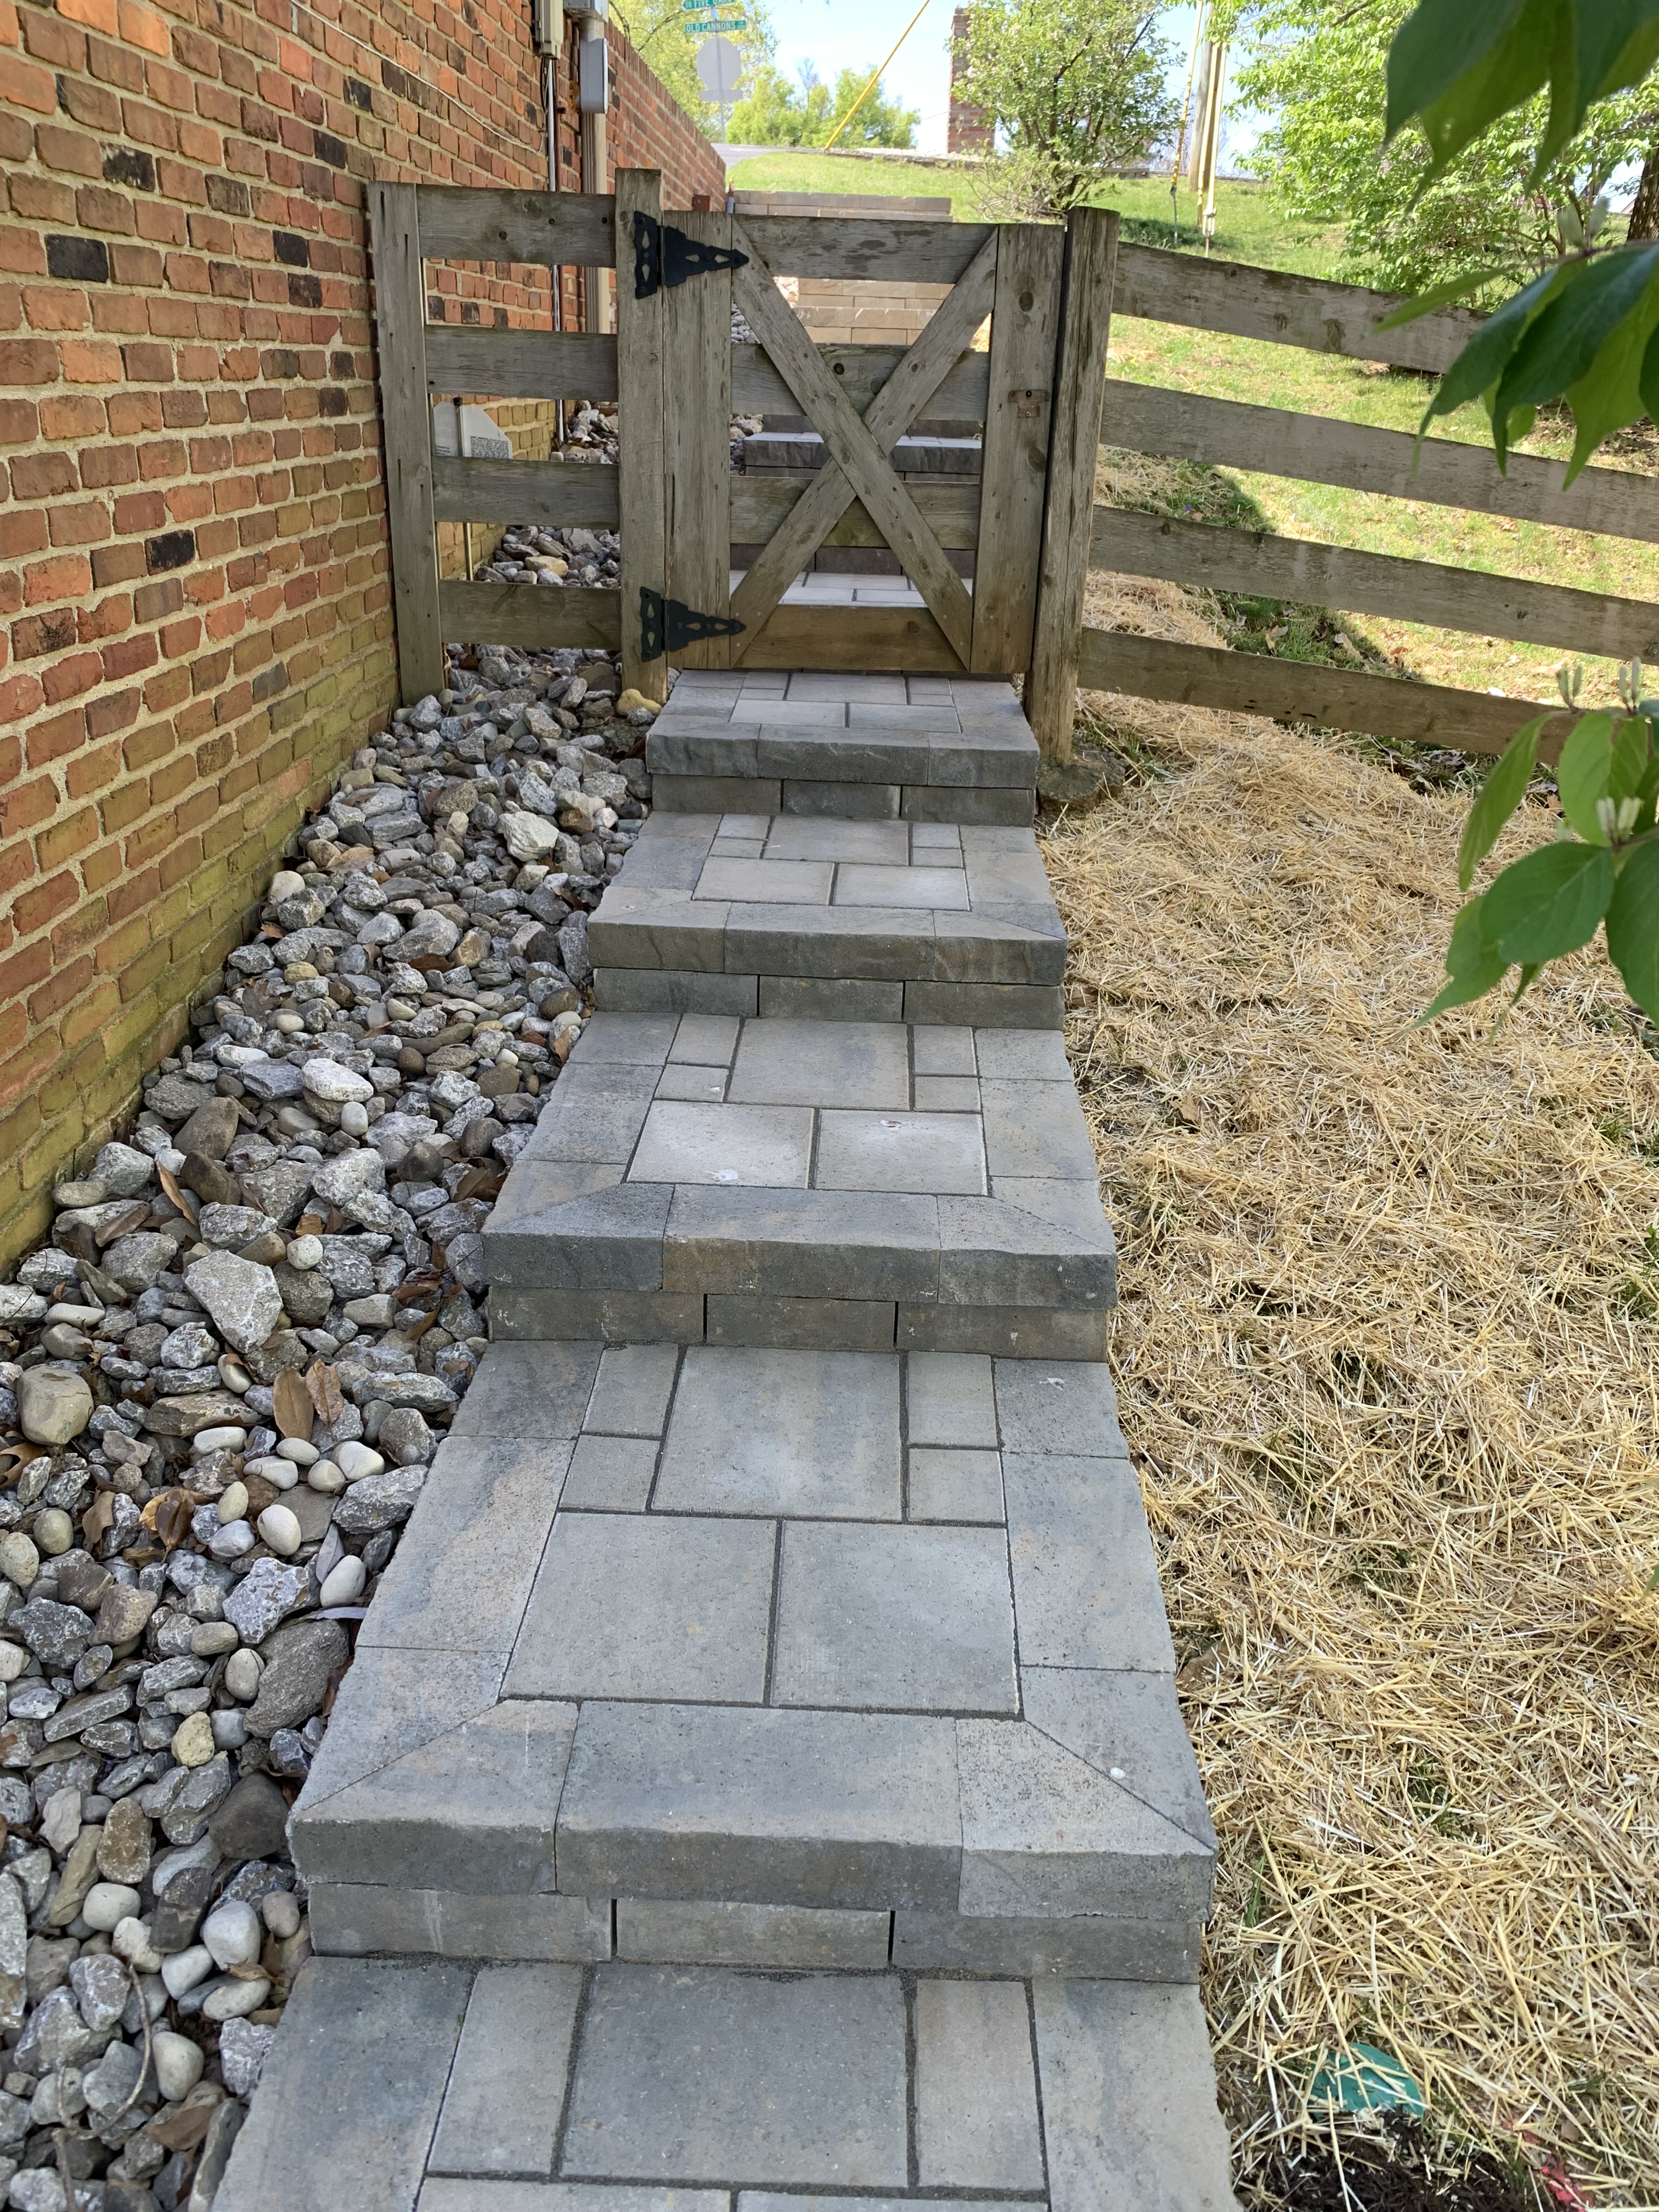
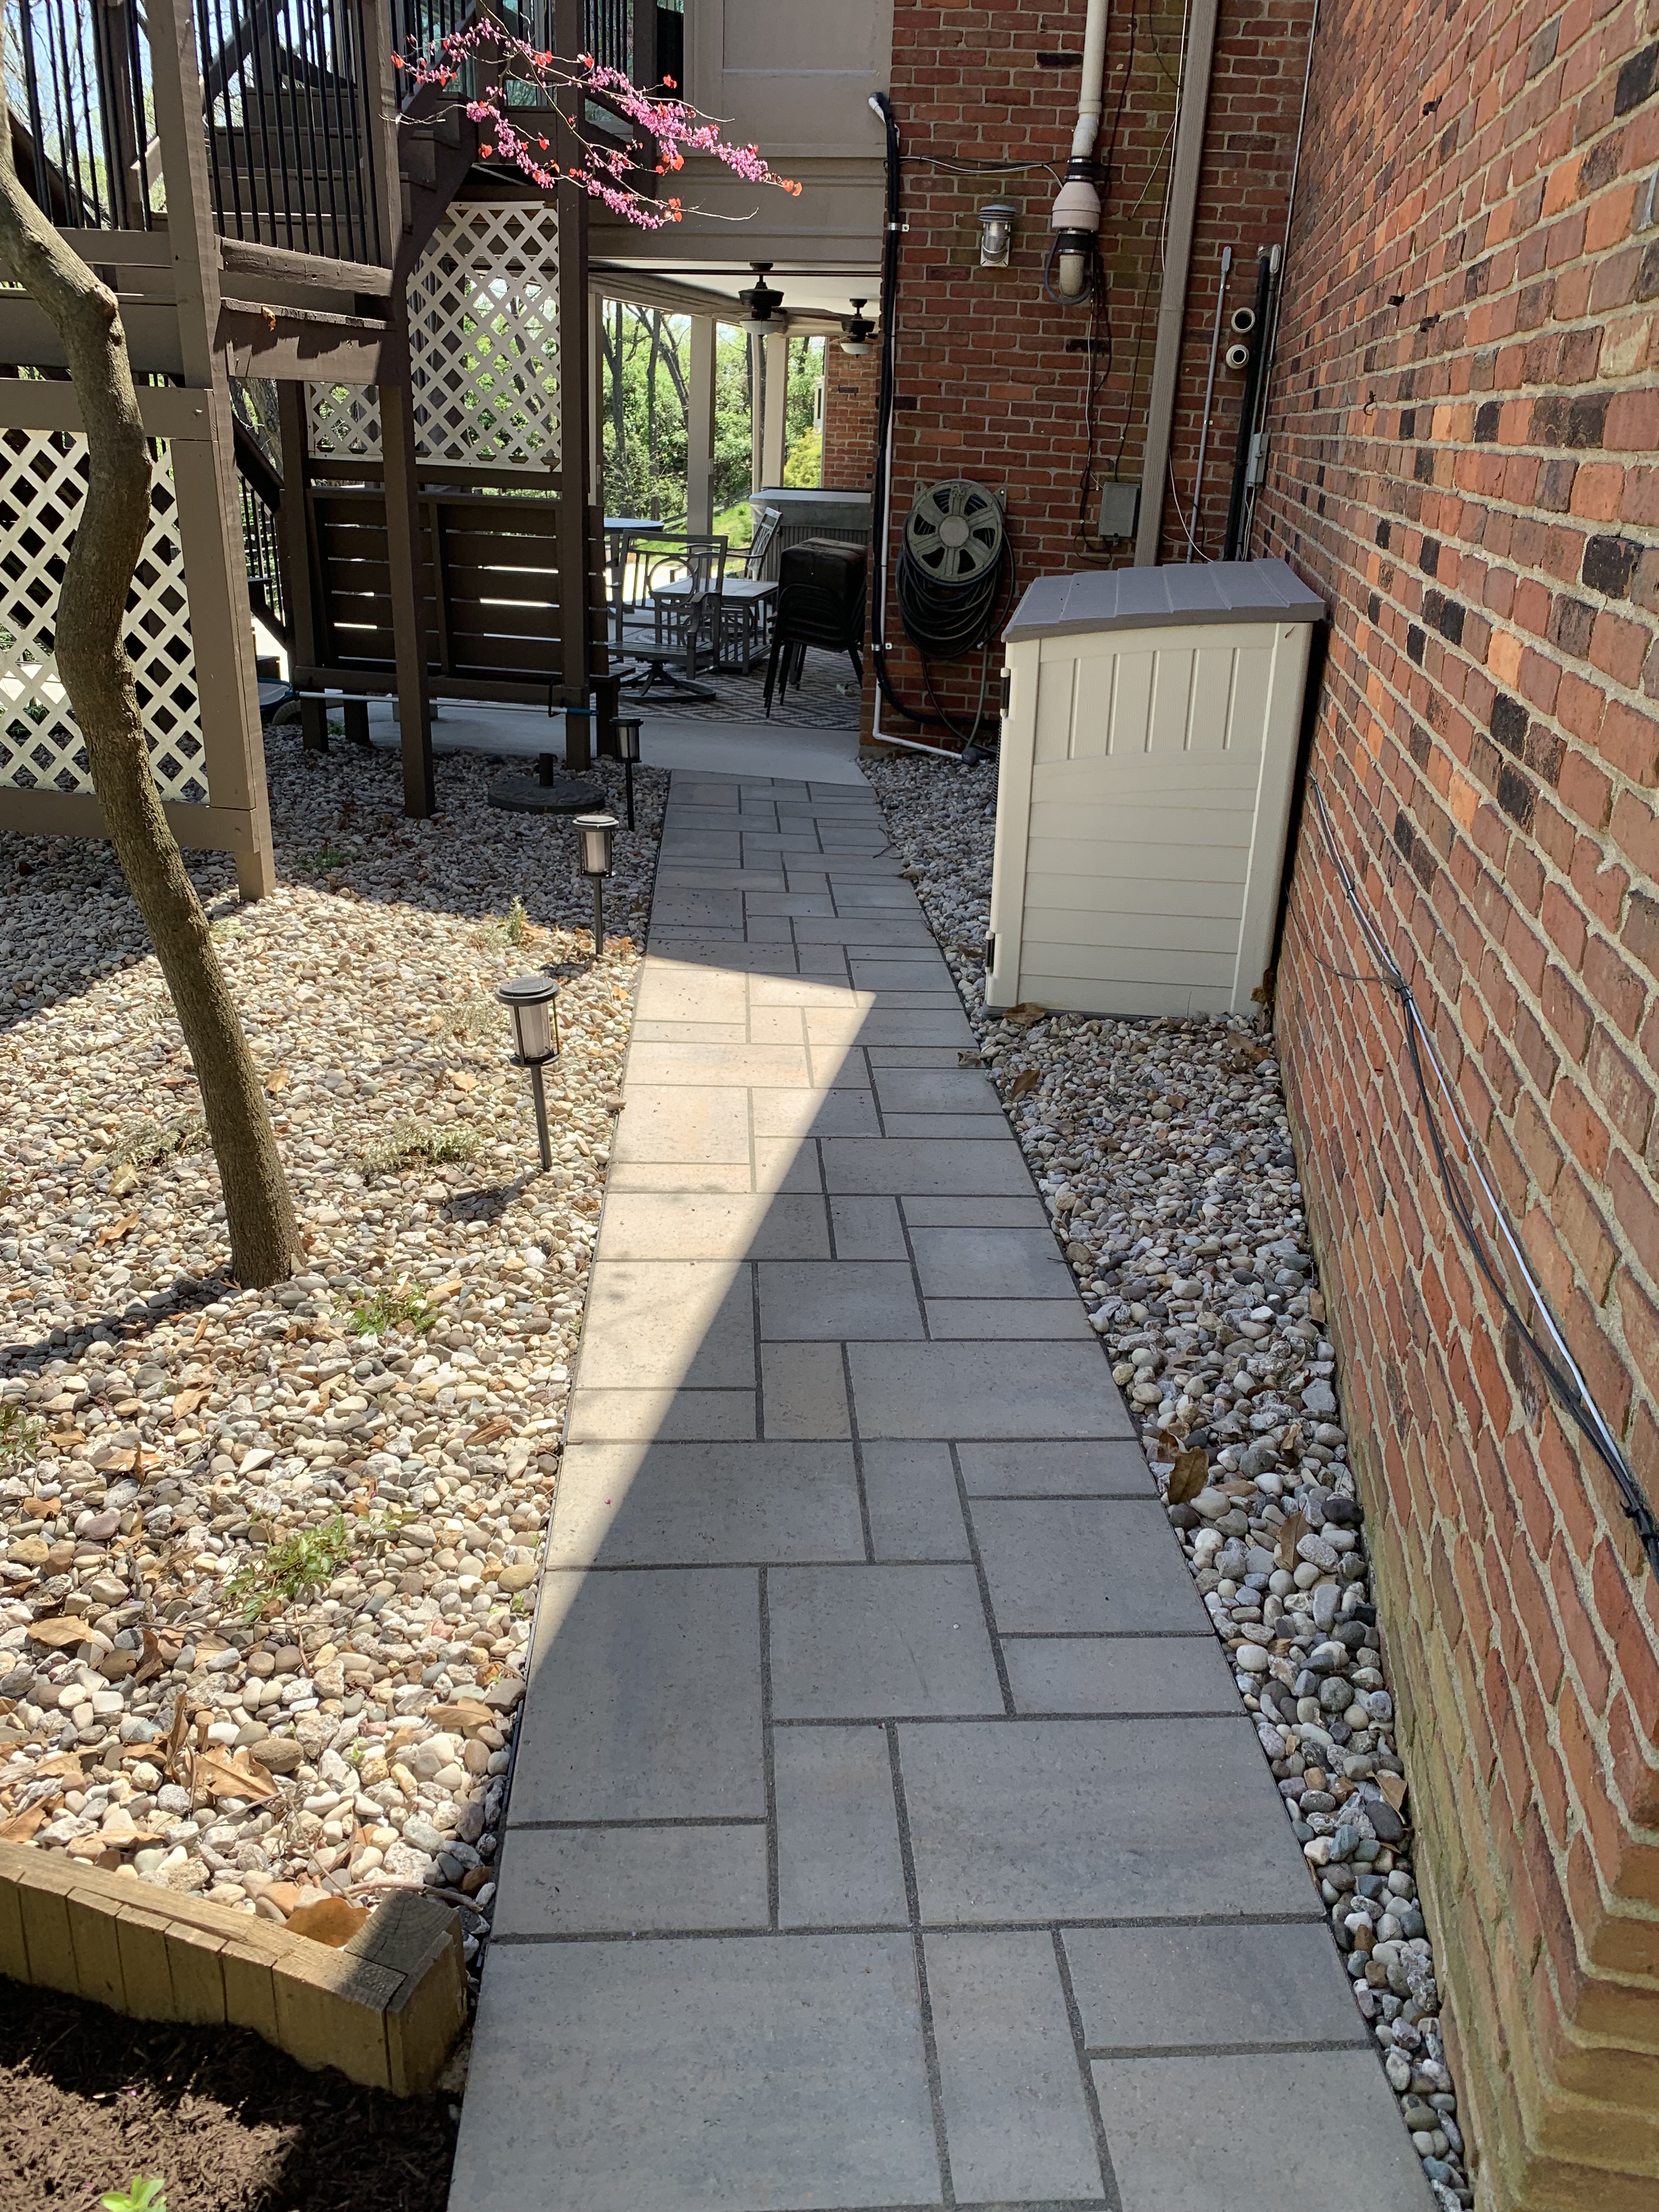
The studio is in a walkout basement in our home that overlooks Beargrass Creek. Access to the studio is via stone steps that run from the driveway alongside the house to a patio where musicians can gather or just hang out when not recording. The patio has a lovely view of the Creek
The door from the patio leads into a mi-size room where furniture can be easily moved around to set up drums, or other louder instruments for tracking. The door at the end of this room leads directly into the control room. The screen can be used as needed to see others in the control room and vice versa.
Here is a view of the control room / isolation booth taken from the large window on the creek side of the room. You can see that a large closet has been converted into a small iso-booth for vocals, etc.
When isolation is needed, or corners need to be taken out of the recording, I now use a lot of these moveable Auralex gobos. They are amazing and work for just about every application possible.
These can be set up around or in the isolation booth if more or less isolation is needed, depending on the voice or instrument and the frequencies you want to enhance or squash.
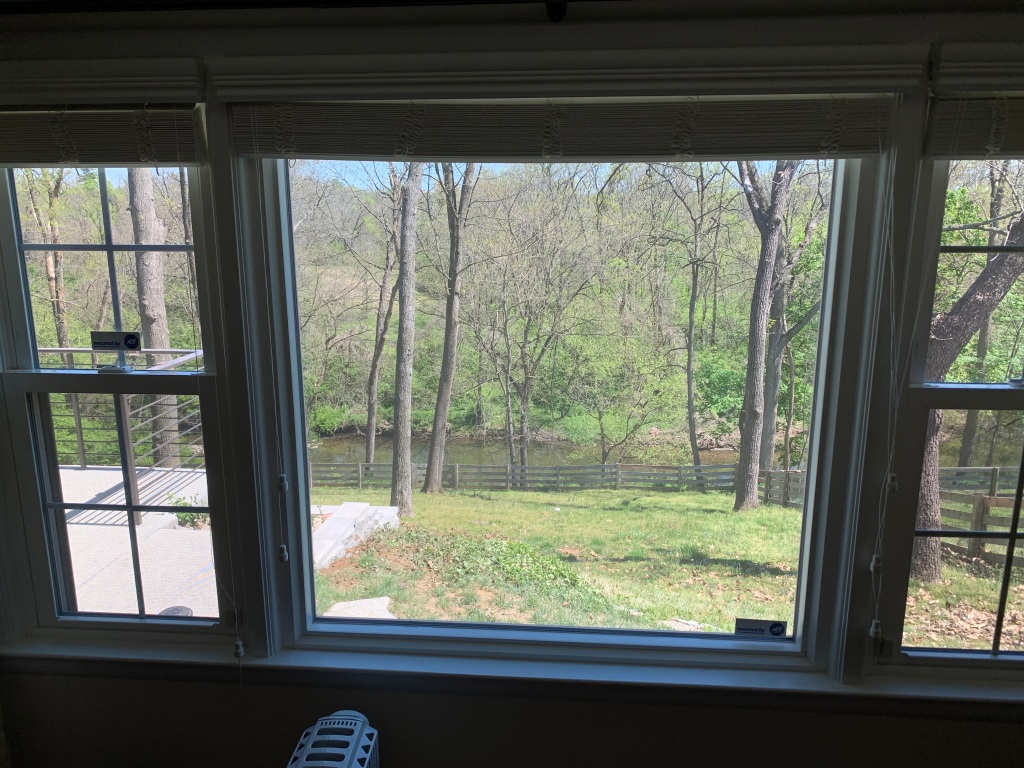
From the isolation booth toward the window, here is the view, and the scene out the window. A great place to work on music!
All in all, it’s a great place to hang out and record music! I’ve settled in now and the vibe and the sounds are absolutely first rate.
An interesting story here. The Rev (John Wiley Nelson) is a singer songwriter from Provincetown, MA, who also spends about half the year living in Portland, OR. He is in his 80s and suffered a serious bout of throat cancer two years ago. During his treatments he wrote an album’s worth of material, and entitled the album his “Swan Song,” thinking it might be his last CD. He recorded the vocal tracks during his recovery, and is now on the mend, doing very well indeed! So, perhaps this CD is not his “Swan Song?” We will see.
The album is fairly stripped down production-wise, mostly acoustic instruments in a folk format. The guitar work was done by guitar genius Kenny Smith. Stuart Duncan recorded the fiddle tracks, and I was delighted to get Chip Bush, Sam Bush’s cousin, who lives near Louisville, to play the mandolin tracks. Randy Kohrs added magical, lyrical dobro tracks. I played bass and added lead guitar on one song, and electric piano on one. All in all, the CD has a lovely feel and is worth a good listen!
Tony Winters, a prominent artist, and Helen Mitsios, a well-known poet and publisher of international poetry, live in New York City. They co-wrote a song entitled Fool for Love, using a country music idiom to express the emotions accompanying a tragic relationship. Tony put down the rhythm and lead electric guitar tracks, I added a low electric guitar track and organ, and Andy Hull added drums (from Nashville). My daughter, Leslie Rodriguez dropped by the studio and recorded the vocals. I added a bass track. We had a great couple of days in the studio tracking and mixing. Here’s a link to the song, Fool For Love.
Tony enjoyed the process so much that he decided to write another song. He returned to the studio a couple of weeks ago on his own with a new song entitled Dragons and Swords. This song has a fantasy feel, in the vein of the Moody Blues, and he wanted some Mellotron in a couple of places on the song, so I obliged him with that. Not my usual cup of tea, but it was fun to invent that element for this song. I also added bass. Andy Hull again played drums. Tony played all the other instruments: rhythm guitar, Tacoma “A guitar” (a small guitar that tunes to an A, and sounds a little like a lute). He also played the very original, signature electric guitar hooks throughout the song. Tony also sang this one, and really did a great job. Take a listen here to Dragons and Swords.
I had the privilege to master the Flat River Band’s new EP. All of the songs were beautifully recoded and mixed by Bryce Roberts at Quad Studios in Nashville. One of the cool things about the EP is that the Flat River Band is three brothers, and they cover one of my favorite three-brothers band songs of all time, I Wish You Were Someone I Love, by the Gatlin Brothers. The Gatlin Brothers joined them in the studio on the recording and Bryce did an incredible job layering the vocals. In the just-released video, the Gatlin Brothers join them on stage.
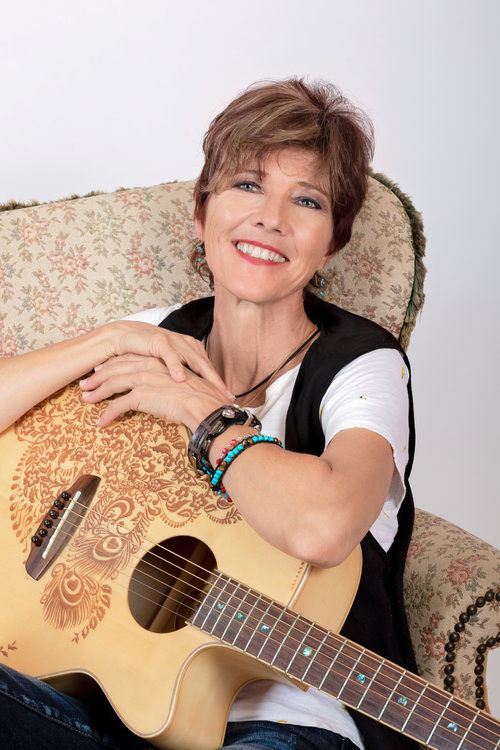
Kim McLean is an amazing, accomplished singer songwriter with credits on albums by Tim McGraw, Trisha Yearwood, and Lee Ann Womack. But she is an incredible performer in her own right and her new EP is a mesmerizing journey into her own life via her seasoned writing and performing talent. We went for a live feel as we recorded this EP in the studio, and it payed off. I wanted to feature her vocals above (literally floating above) the band – so that her voice and the lyrics are felt and heard. The emotion in her voice is everything on this EP, and it can bring you to tears if you’re not prepared.
A release date hasn’t been announced for the EP, but here’s a sneak preview of one of my favorites on the album on my private SoundCloud account.
After a series of great tracking and mixing sessions, the Flat River Band released its EP and video for their new album titled Every Dog Has Its Day. Here’s a link to the video for the title song.
When you hear the songs, you can tell that they harmonize like only family can! In the studio, I wanted to catch the spontaneity and energy that they get during live performances so we recorded the vocals all at the same time instead of overdubbing. The feel is great! The review on Billboard.com was great. Thanks for the shout-out to the studio!
Here’s a live performance of the song:
Check out the entire album on YouTube (or your favorite streaming service)!